• This page, Guide for Viewing and Updating Payroll and Compensation Information, is   offered by
  • Human Resources

Guide for Viewing and Updating Payroll and Compensation Information

The following information is designed for users to view and manage their Payroll and Compensation Data in Employee Self-Service.

Table of Contents

Updating your W-2/W-2c Consent and Viewing your W-2/W-2c Forms

All employees will have access within Employee Self-Service that will allow the ability to update their W-2/W-2c preferences. As an employee, you may consent to receive an electronic W-2/W-2c version of your Annual W-2/W-2c Federal tax form. If you consent to receiving an electronic copy, it will replace the paper copy that will be mailed out. The electronic W-2/W-2c form is a legally file-able copy for your Federal Tax filings.

Once you have consented, you may view, save, or print your W-2/W-2c form. There will be multiple years of Federal Tax forms available online through Employee Self Service.

Important Reminders:

  • Employees who have more than four Box 14 items will receive a notice to expect two W-2 Forms. The second form will contain only additional optional reporting information.
  • Employees of Agencies that utilize the MassHR Employee Service Center (ESC) should contact the ESC with W-2/W-2c related questions by calling 1-855-4HR-SPPT (1-855-447-7778) or for TTY users: (617) 248-0546.
  • Employees of Agencies that do not use the ESC should contact their Agency Human Resources or Payroll Department with W-2/W-2c related questions.

Submit your W-2/W-2c Consent:

Step Action
1. Log in to Employee Self-Service with your user ID (employee ID) and password.
2. From the Employee Self-Service homepage, select the Payroll tile.
3. On the Payroll page, select the W-2/W-2c CONSENT tile. The tile will show your current consent status.
4. You will arrive at the W-2/W-2c Consent Form page. Please scroll down through the text box, in order to review all of the information on the page.
5.

To Submit your W-2/W-2c consent to receive an electronic W-2 or W-2c form, select the Check Box, “I consent to receive electronic W-2 or W-2c forms electronically.”

Then select SUBMIT.
6. You will be directed to the VerifyIdentity page. You will need to verify your identity by typing in your password. You will notice that your User ID is pre-populated for you.

Enter your Self Service password and select CONTINUE.
7. Once you have verified your identity, you will return to the W-2/W-2c Consent Page.
8. You will now see your current consent status:

You will receive W-2 or W-2c forms electronically.

This confirms that you will receive an electronic W-2/W-2c form. The W-2/W-2c Consent tile will now show Consent received.
9. Select the HOME link once you have completed your consent.


Withdraw your W-2/W-2c Consent:

Step Action
1. Log in to Employee Self-Service with your user ID (employee ID) and password.
2. From the Employee Self-Service homepage, select the Payroll tile.
3. On the Payroll page, select the W-2/W-2c CONSENT tile. The tile will show your current consent status.
4. You will arrive at the W-2/W-2c Consent Form page. Please scroll down through the text box, in order to review all of the information on the page.
5.

To Withdraw your consent to receive electronic W-2 or W-2c form, select the Check Box, “I withdraw my consent to receive W-2 or W-2c forms electronically.

Then select SUBMIT.
6. You will be directed to the Verify Identity page. You will need to verify your identity by typing in your password. You will notice that your User ID is pre-populated for you.

Enter your Self Service password and select CONTINUE.
7. Once you have verified your identity, you will return to the W-2/W-2c Consent Page.
8.

You will now see your current consent status:

  • Your Current Status: Consent Withdrawn.
This confirms that you will not receive an electronic W-2/W-2c form. The W-2/W-2c Consent tile will now show No consent received.
9. Select the HOME link once you have completed your consent.


View your W-2/W-2c:

Step Action
1. Log in to Employee Self-Service with your user ID (employee ID) and password.
2. From the Employee Self-Service homepage, select the Payroll tile.
3. On the Payroll page, select the W-2/W-2c FORMS tile. The Tile will show the current Tax Year Form.
4. The system will prompt you to answer your security question.
(Your security question is set up in Systems Settings tile> My System Profile tile, click the link Change or set up forgotten password help)
5. You will arrive on the VIEW W-2/W-2c FORMS page, where you will be allowed to review your most recent W-2/W-2c form.
6. The areas available for view are the following:

Tax Form: Will display either W-2 or W-2c.
Issue Date: The date in which the W-2/W-2c is issued.
Year End Form: The link that will open the W-2/W-2c form.
Filing Instructions: The Federal Instructions to an Employee on the back side of a W-2/W-2c form.

Select the View Form link, in order to view your selected W-2/W-2c form. To view other Tax Year forms select the Tax Year from the drop down on the top of the page.


Electronic W-2/W-2c View: You have the option to save or print your W-2/W-2c form.

For detailed information on how to understand your W-2/W-2c form, please refer to the annual W-2 Brochures, which can be located on the Comptroller’s Website (See Additional Resources).
Additional Resources   for Updating your W-2/W-2c Consent and Viewing your W-2/W-2c Forms

Updating your 1095-C/1095-C Correction Consent and Viewing your 1095-C/1095-C Correction Forms

All employees have access in Employee Self-Service that allows the ability to update their 1095-C forms delivery preferences. You may consent to receive electronic 1095-C as well as 1095-C correction forms. If you consent to receiving electronic copies, these will replace the paper copy delivery. The electronic 1095-C and 1095-C Correction forms are legal copies that you can retain for your Federal Tax records.

Once you have consented, you may view, save, or print your 1095-C and1095-C Correction form, as needed.

Important Reminders:

  • Employees who were determined to be full-time employee of the Commonwealth under the Affordable Care Act (ACA) rules will be reported on the form 1095-C for the calendar year.
  • Employees of Agencies that utilize the MassHR Employee Service Center (ESC) should contact the ESC with 1095-C/1095-C Correction form related questions by calling 1-855-4HR-SPPT (1-855-447-7778) or for TTY users: (617) 248-0546.
  • Employees of Agencies that do not use the ESC should contact their Agency Human Resources or Payroll Department with 1095-C/1095-C Correction form related questions.


Submit your 1095-C forms Consent:

Step Action
1. Log in to Employee Self-Service with your user ID (employee ID) and password.
2. From the Employee Self-Service homepage, select the Benefit Details tile.
3. On the Benefit Details page, select the Form 1095-C CONSENT tile. The tile will show your current consent status.
4. You will arrive at the Form 1095-C Consent page. Please scroll down through the text box, in order to review all of the information on the page.
5. To Submit your 1095-C consent to receive an electronic 1095-C form, select the Check Box, “I consent to receive Form 1095-C electronically.”

Then select SUBMIT.
6. You will be directed to the Verify Identity page. You will need to verify your identity by typing in your password. You will notice that your User ID is pre-populated for you.

Enter your Self Service password and select CONTINUE.
7. Once you have verified your identity, you will return to the 1095-C Consent Page.
9.

You will now see your current consent status:

"You currently receive Form 1095-C statements electronically

Your Consent Form to receive an electronic Form 1095-C has been submitted. If you prefer to receive a paper Form 1095-C, you must submit a Withdrawal of Consent Form. After you submit the Withdrawal of Consent Form, it is valid until you submit a Withdrawal of Consent Form. If you have any questions, please contact your Benefits Administrator.”

This confirms that you will receive an electronic 1095-C form.

10. Select the HOME link once you have completed your consent.


Withdraw your 1095-C forms Consent:

Step Action
1. Log in to Employee Self-Service with your user ID (employee ID) and password.
2. From the Employee Self-Service homepage, select the Benefit Details tile.
3. On the Benefit Details page, select the Form 1095-C CONSENT tile. The tile will show your current consent status.
4. You will arrive at the 1095-C Consent Form page. Please scroll down through the text box, in order to review all of the information on the page.
5. To Withdraw your consent to receive electronic 1095-Cform, select the Check Box, “I withdraw my consent to receive Form 1095-C electronically.

Then select SUBMIT.
6. You will be directed to the Verify Identity page. You will need to verify your identity by typing in your password. You will notice that your User ID is pre-populated for you.

Enter your Self Service password and select CONTINUE.
7. Once you have verified your identity, you will return to the 1095-C Consent Page.
8.

You will now see your current consent status:

"You will now receive Form 1095-C paper statements by mail

You have withdrawn your consent to receive an electronic Form 1095-C. You will receive a paper Form 1095-C by mail. If you have any questions, please contact your Benefits Administrator.”

This confirms that you will not receive an electronic 1095-C form.

9. Select the HOME link once you have completed your consent.


View your online 1095-C and 1095-C Correction form:

Step Action
1. Log in to Employee Self-Service with your user ID (employee ID) and password.
2. From the Employee Self-Service homepage, select the Benefit Details tile.
3. On the Benefit Details page, select the VIEW Form 1095-C tile. The tile will show the current Tax Year form.
4. You will arrive on the VIEW 1095-C/1095-C Correction form FORMS page where you will be allowed to review your most recent forms.
5. Select the Tax Form and/or Filing Instructions for Calendar year to view your 1095-C/1095-C Correction forms.

Year: The tax year in which the 1095-C/1095-C Correction form is completed for, presented in YYYY format.
Employer: Will display Commonwealth of Massachusetts.
IRS Instructions: The Federal Instructions to an Employee on the back side of a 1095-C/1095-C Correction form.
Issue Date/Sequence: The date in which the 1095-C/1095-C Correction form is issued.
Tax Form: The link that will open the 1095-C/1095-C Correction form.

Electronic 1095-C and 1095-C Correction form view: You have the option to save or print your 1095-C and 1095-C Correction form.

For detailed information on how to understand your 1095-C or 1095-C Correction form, please refer to the 1095-C Brochures, which can be located on the Comptroller’s Website (See Additional Resources).

Additional Resources   for Updating your 1095-C/1095-C Correction Consent and Viewing your 1095-C/1095-C Correction Forms

Updating W-4 Tax Information

Employees will have access to Employee Self-Service which will allow the ability to view and/or update their Form W-4 Tax Information.

You must complete Form W-4 so the Payroll Department can calculate the correct amount of tax to withhold from your pay. Federal income tax is withheld from your wages based on the marital status on this form.

You may also specify that an additional dollar amount be withheld. You can file a new Form W-4 anytime your tax situation changes, and you choose to have more, or less, tax withheld. Whether you are entitled to claim more than one exemption from withholding is subject to review by the IRS. Your employer may be required to send a copy of this form to the IRS.

Important Reminders:

  • For detailed information on how to complete your W-4, please refer to the IRS W-4 page: http://www.irs.gov/file_source/pub/irs-pdf/fw4.pdf
  • Your online W-4 submission updates your Federal Tax Data only. If you need to update your State Withholdings, you must update your State Tax M-4 Information.
  • Employees of Agencies that utilize the MassHR Employee Service Center (ESC) should contact the ESC with W-4 related questions by calling 1-855-4HR-SPPT (1-855-447-7778) or for TTY users: (617) 248-0546.
  • Employees of Agencies that do not use the ESC should contact their Agency Human Resources or Payroll Department with W-4 related questions.

W-4 Tax Information:

Step Action
1. Log in to Employee Self-Service with your user ID (employee ID) and password.
2. From the Employee Self-Service homepage, select the Payroll tile.
3. On the Payroll page, select the W-4 Tax Information tile. You will arrive at the W-4 Withholding Certificate page.
4.

Step 1. Personal Information

  • If your last name differs from that shown on your social security card. You must call 1-800-772-1213 for a new card.
5.

Address

  • Please be sure to verify the address, on your W-4 Tax Information. If you need to update either your Home and/or Mailing Address, please refer to the Job Aid on the MassHR Employee Service Center Website: Employee Self-Service: Updating Personal Information.
6. Filing Status

Please check one box:
  • Select single or married filing separately
  • Select Married filing jointly (or qualifying widow(er)
  • Select Head of Household (Check only if you are unmarried and pay more than half the cost of keeping up a home for yourself and a qualifying individual).
  • Note: It is important that the correct button be selected, since this will determine which federal tax calculation is used to calculate the employee’s federal income tax withholding.
7. Complete Step 2 through 4 on W-4 form ONLY if they apply to you. To see if you are exempt from withholding or you have concerns about your privacy, see instructions for Form W-4 on the IRS website
8.

Step 2: Multiple Jobs or Spouse Works

  • Check if you (1) hold more than one job at a time, or (2) are married filing jointly and your spouse also works.  The correct amount of withholding depends on income earned from all these jobs.
    Complete Steps 3 through 4(b) on Form W-4 for only one of these jobs. Leave those steps blank for the other jobs. (Your withholding will be most accurate if you complete Steps 3 through 4(b) on the Form W-4 for the highest paying job.)
9.

Step 3: Claim Dependents

  • Fill in this section if your  your income will be $200,000 or less ($400,000 or less if married filing jointly)
10.

Step 4: Other Adjustments

(a) Other Income. If you want tax withheld for other income you expect this year that won't have withholding, enter the amount of other income here. This may include interest, dividends, and retirement income. You should not include income from any jobs.

(b) Deductions. If you expect to claim deductions other than the standard deduction and want to reduce your withholding, use the Deductions Worksheet and enter the result here.

(c) Extra withholding. Enter any additional tax you want withheld each pay period.

11. Claim Exemption from Withholding: Complete if necessary for your Tax Information.

In order to claim an exemption from Federal Withholding, as an employee, you must meet BOTH conditions list below:
  • Last year I owed no Federal income tax.
  • This year I expect to owe no Federal income tax.

Check the box if you meet both conditions to claim exemption from tax withholding.

Important: If you claim exemption, you will have NO Federal Wages showing in Box 1 Wages, tips, and other compensation of the W2. In addition, employees who claim Exempt must resubmit their Exempt Status by February 15 every year.

12. Please be sure to verify the information you have entered is accurate.
13. Select the SUBMIT button in order to certify your W-4 selection. By selecting submit, you certify, “Under penalties of perjury, I declare that I have examined this certificate and to the best of my knowledge and belief, it is true, correct, and complete.”
12. Once you have selected the submit button, you will be directed to the Verify Identity page. You will need to verify your identity by typing in your password. You will notice that your User ID is pre-populated for you.

Enter your Self Service password and click CONTINUE.
13. Select the OK button to confirm the submit was successful.
14. Select the HOME icon once you have completed your W-4 Tax Information.

Updating State Tax M-4 Information

Employees will have access to Employee Self-Service which will allow the ability to view and/or update their State Tax M-4 Information.

You must complete Form M-4 so the Payroll Department can calculate the correct amount of tax to withhold from your pay.

You may also specify that an additional dollar amount be withheld. You can file a new M-4 anytime your tax situation changes, and you choose to have more, or less, tax withheld.

If Not Applicable is pre-selected on the M-4 or you update the M-4 to select Not Applicable, the status will default to your Federal Tax Status. Changing from exempt status to non-exempt will default to Not Applicable and default to the Federal Tax Status.

For detailed information on how to complete your M-4, please refer to the state income tax form page: M-4 (mass.gov).

Your online M-4 submission updates your State Tax Data only.

M-4 Tax Information:

Step

Action

1.

Log in to Employee Self-Service with your user ID (employee ID) and password.

2.

From the Employee Self-Service homepage, select the Payroll tile.

3.

On the Payroll page, select the State Tax M-4 Information tile.

4.

Personal Information

  • If your last name differs from that shown on your social security card. You must call 1-800-772-1213 for a new card.

5.

Address

  • Please be sure to verify the address, on your State Tax M-4 Information. If you need to update either your Home and/or Mailing Address, please refer to the Job Aid on the MassHR Employee Service Center Website: Employee Self-Service: Updating Personal Information.

6.

Enter the total number of Allowances you are claiming in the Withholding Allowances field.

Enter a valid value, i.e. “1”.

7.

If you want to have an additional amount withheld from each paycheck, you would enter the amount into the Enter Additional Amount, if any, you want withheld from each paycheck field. Enter a valid value, i.e. “40.00”.

8.

Select a radio button for the State Withholding Status you are claiming from the Additional M-4 Options.

9.

Select the Claim Exemption checkbox if you claim an exemption from Massachusetts withholding tax.

Note: You must not be claiming an Allowance and you are not requesting an Additional Amount to be withheld from each paycheck.

10.

Select the Submit button.

11.

Once you have selected the submit button, you will be directed to the Verify Identity page. You will need to verify your identity by typing in your password. You will notice that your User ID is pre-populated for you.

Enter your Self-Service password and click CONTINUE.

12.

Select the OK button to confirm the submission was successful.

13.

Select the HOME icon once you have completed your M-4 Tax Information.

Updating Direct Deposit

All employees will have access within Employee Self-Service that will allow the ability to view, add, update, and/or delete direct deposit information

Important Reminders:

  • To make any changes to your Direct Deposit you'll need to have a Mobile phone, that phone number must be entered in your personal information in HR/CMS, and it must be able to receive texts. If any of the above criteria isn't met, you will be unable to make any changes to your Direct Deposit information online. Note that if you change or add a Mobile phone number in HR/CMS it will take 24 hours for that to take affect. If you do not have a mobile phone or need assistance contact the Employee Service Center, or if you are not supported by the ESC, contact your Agency Payroll Department.
  • An email address should be set up in your system profile and/or your personal data. If you do not have an email address available in HRCMS system profile data and/or your Personal data you will not be able to make any changes in Direct Deposit. The system will prompt the following error message:
    "You cannot make changes at this time. Please contact your department or the Employee Service Center for assistance."
  • Do not use a bank deposit slip to add/edit your direct deposit information. Your routing and account numbers are not on your Debit/ ATM card. Obtain the information from a Personal Check, if available. Click the View Check Example info button if you are unable to define the routing/account numbers. The Routing Number is the first set of 9 digits at the bottom of your check. Your Account Number is listed directly to the right after the Routing Number. Do not include the check number, which is to the right of the account number. If you still require assistance, contact your financial institution for help in determining your banking information
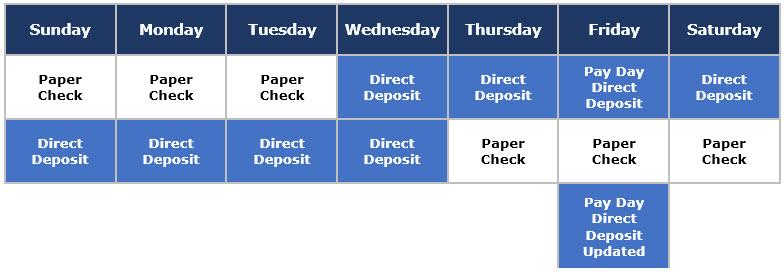
  • Direct Deposit account changes made the Wednesday before Pay Day through the following Wednesday before 6PM, will take effect in your next pay advice. Changes on other days may result in a paper check.
Image showing days direct deposit can be updated

You are responsible for the accuracy of your data; please review carefully before saving page.

  • Employees of Agencies that utilize the MassHR Employee Service Center (ESC) should contact the ESC with direct deposit related questions by calling 1-855-4HR-SPPT (1-855-447-7778) or for TTY users: (617) 248-0546.
  • Employees of Agencies that do not use ESC should contact their Agency Human Resources or Payroll Department with direct deposit related questions.


Add Direct Deposit:

Note: If you are enrolling into direct deposit for the first time, the first account you create must have a "Deposit Type" of "Balance". You can then create additional accounts as necessary. The "Balance" account will receive 100% of your net pay funds if no other accounts are created.

Step Action
1. Log in to Employee Self-Service with your user ID (employee ID) and password.
2. From the Employee Self-Service homepage, select the Payroll tile.
3. On the Payroll page, select the Direct Deposit tile.
4. You will be prompted that an authorization code will be sent to your mobile phone. Verify your phone number and select SEND CODE. Enter the code into the Security Code field and select submit. You will arrive on the Direct Deposit page.
5. To add a new direct deposit account, select the + button.
6. You will arrive on the Add Direct Deposit page. The areas available for view and updates are the following:
  • Nickname: Enter a Nickname for account; i.e. Vacation Savings
  • Routing Number: Enter the Routing Number of your banking institution.
  • Account Number: Enter the Account Number of your banking institution.
  • Account Type: Enter in your account type: Checking or Savings
  • Deposit Type: Enter in your deposit type:
  • Amount: A flat dollar amount; i.e. $10
  • Remaining Balance: The final net pay you are to receive, after all taxes, deductions, and other deposits have occurred. If this is your first direct deposit account, always enter in the Balance Direct Deposit account type first.
  • Percent: A percentage; i.e. 25%
  • Amount or Percent: Enter the dollar or percentage you wish to have allocated, if your Deposit Type is listed as Amount or Percentage.
7. Please be sure to verify the information you have entered is accurate. Select the Save button once you have completed adding a direct deposit account. You will receive an email from Mass HR confirming the Direct Deposit change.
8. Adjust Deposit Order: If you have more than three direct deposit accounts, you can change the order in which you wish to have your direct deposit submitted to your bank accounts using the Reorder button. The Remaining Balance Deposit Type will always default to Last. This means that the system will remit the remainder of your net pay funds into your main direct deposit account that you have selected. When ordering your accounts you can only use numbers that are within the range of the accounts that you have. For example, If you have five accounts, you can only use numbers 1-4 for ordering then have Last for your remaining balance account. If you select 1, for example, it will be the first account to have direct deposit presented into it and all other accounts will follow sequentially.
NOTE: Employees cannot change the Last (Remaining Balance) account. If changes are needed you will need to contact the Employee Service Center (ESC) or your Department's HR/Payroll office if you do not use the ESC.


View a Direct Deposit Account:

Step Action
1. Select the DIRECT DEPOSIT tile. You will be prompted that an authorization code will be sent to your mobile phone. Verify your phone number and select SEND CODE. Enter the code into the Security Code field and select submit. You will arrive on the Direct Deposit page.
2. Once within the DIRECT DEPOSIT page, you have the option to VIEW any existing Checking or Saving Direct Deposit Accounts that are present.
3. Within the Accounts table on the Direct Deposit page, select the account that you wish to view. You will now be in the Edit Account page.
4. You will be able to review the Nickname, Routing Number, Account Number, Account Type, Deposit Type, and Amount or Percent selected of the Direct Deposit selected. If changes are needed they can be made here.
5. To go back to the Direct Deposit page, select the Cancel button in the pop up window.


Edit Direct Deposit:

You have the ability to edit an existing direct deposit account.

Step Action
1. Select the DIRECT DEPOSIT tile. You will be prompted that an authorization code will be sent to your mobile phone. Verify your phone number and select SEND CODE. Enter the code into the Security Code field and select submit. You will arrive on the Direct Deposit page.
2. Once within the DIRECT DEPOSIT page, you have the option to EDIT any existing Direct Deposit Accounts that are present.
3. To edit an existing Checking or Savings Direct Deposit Account, select the account you wish to edit.
4. You will arrive on the Edit Account page. The areas available for view and updates are the following:
  • Nickname: Enter a Nickname for account; i.e. Vacation Savings
  • Routing Number: Enter the Routing Number of your banking institution.
  • Account Number: Enter the Account Number of your banking institution.
  • Account Type: Enter in your account type: Checking or Savings
  • Deposit Type: Enter in your deposit type:
  • Amount: A flat dollar amount; i.e. $10
  • Balance: The final net pay you are to receive, after all taxes, deductions, and other deposits have occurred.
    NOTE: Employees cannot change the Last (Remaining Balance) account. If changes are needed you will need to contact the Employee Service Center (ESC) or your Department's HR/Payroll office if you do not use the ESC.
  • Percent: A percentage; i.e. 25%
  • Amount or Percent: Enter the dollar or percentage you wish to have allocated, if your Deposit Type is listed as Amount or Percentage.
5. Please be sure to verify the information you have entered is accurate. Select the Save button once you have completed editing a direct deposit account. You will arrive back on the Direct Deposit page. You will receive an email from Mass HR confirming the Direct Deposit change.


Delete Direct Deposit:

You have the ability to delete an existing direct deposit account.

  • Important: Employees will be unable to delete or Reorder a direct deposit account that is marked as a Balance account. You will need to contact the Employee Service Center or your department's HR/Payroll office to reorder or remove a Balance account.
Step Action
1. Select the DIRECT DEPOSIT tile. You will be prompted that an authorization code will be sent to your mobile phone. Verify your phone number and select SEND CODE. Enter the code into the Security Code field and select submit. You will arrive on the Direct Deposit page.
2. Select the Account you wish to delete. This will open the Edit Account pop up page. Select the Remove button at the bottom of the page.

Note: You cannot delete a Balance account.
3. Select the YES button in order to confirm the delete request. If you select YES, you will return to the Direct Deposit page, showing the account was deleted as requested. You will receive an email from Mass HR confirming the Direct Deposit change.
4. Select the NO button to cancel the delete request. If you select NO, you will return to the Edit Account pop up page. Select the Cancel button to return to the Direct Deposit Page.

View Paycheck

Employees can view current paychecks within Employee Self-Service as a PDF and historical paychecks as a Webpage (HTML).

Important Reminders:

  • Employees of Agencies that utilize the MassHR Employee Service Center (ESC) should contact the ESC with paycheck related questions by calling 1-855-4HR-SPPT (1-855-447-7778) or for TTY users: (617) 248-0546.
  • Employees of Agencies that do not use ESC should contact their Agency Human Resources or Payroll Department with paycheck related questions.

View Paycheck:

Step Action
1. Log in to Employee Self-Service with your user ID (employee ID) and password.
2. From the Employee Self-Service homepage, select the Payroll tile.
3. On the Payroll page, select the Paycheck tile. The tile will show your most recent pay info.
4. You will arrive on the PAY page, where you will be allowed to review your available paychecks.
5.  The areas available for view are the following:
  • Check Date: The date in which the payment is completed, presented in a YYYY-MM-DD format.
  • Company: Will display the Commonwealth of Massachusetts.
  • Pay Begin Date: The date in which the two-week pay period began, in a MM-DD-YYYY format.
  • Pay End Date: The date in which the two-week pay period ended, in a MM-DD-YYYY format.
  • Net Pay: The take home pay received after all taxes and deductions have been deducted
  • Paycheck Number: The number provided on all pay advices
  • Prior Period Adjustment Link: Will show details of paid prior period adjustments (if any) included in the paycheck. 

Select the specific check to access the desired paycheck you wish to view.

PDF File Check View: Your Paycheck will display in a PDF format.

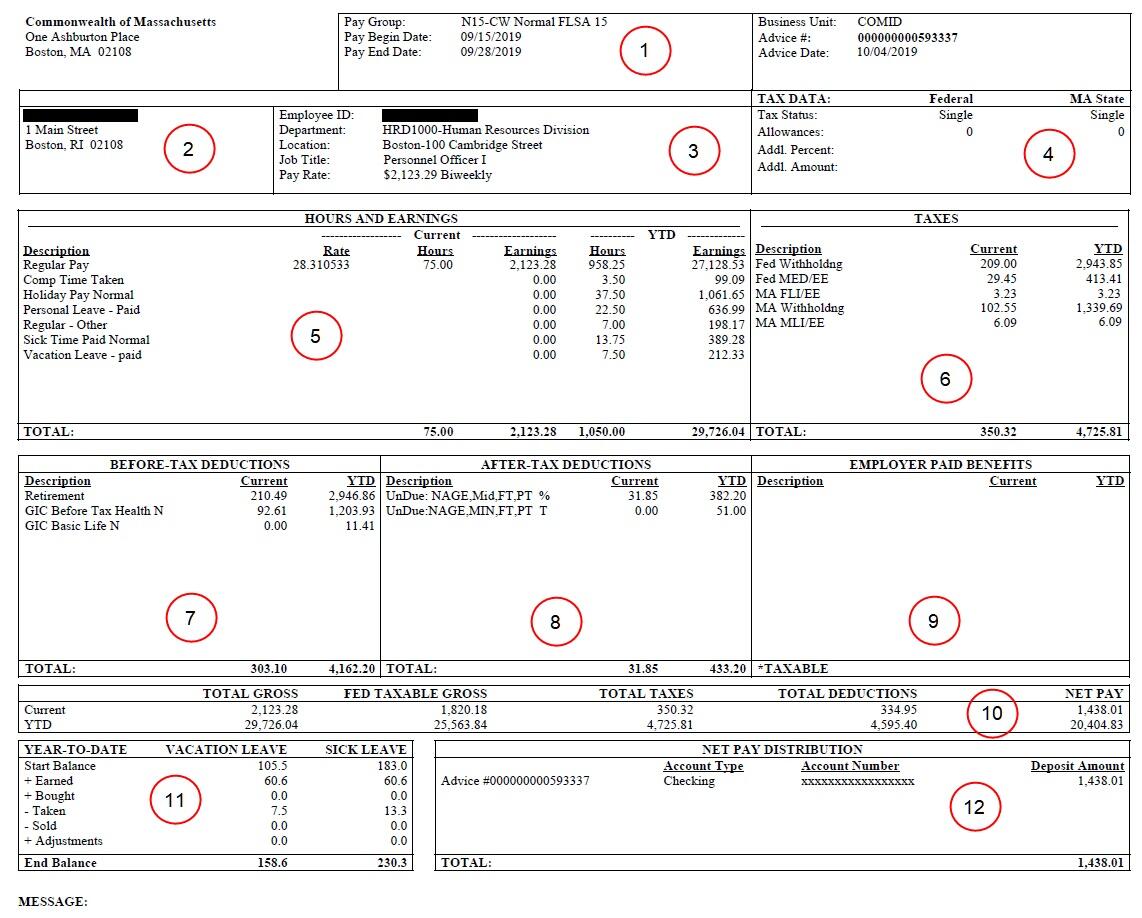
Image of Pay Advice

Understanding your Paycheck:

Area    

Description

1. Indicates the pay-period for which you are being paid, as well as the date your pay is issued.
2. Your name and address prints here. This is the "Home Address" and is used for W2 Mailings as well.
3. Contains your Employee ID, Dept. and location of employment, job title and pay-rate.
4. Identifies your Federal and State tax information as reported on your W-4/M-4 form.
5. Details of earnings paid in the current period and all earnings paid Year to Date (YTD).
6. Details of taxes paid in the current period and all taxes paid YTD. Withholding is regular federal and state taxes. MED/EE is Medicare Tax. FLI/EE is Paid Family Leave Tax. MLI/EE is Paid Medical Leave Tax.
7. Details of before-tax deductions paid in the current period and all before-tax deductions paid YTD.
8. Details of after-tax deductions paid in the current period and all after-tax deductions paid YTD.
9. Details of Commonwealth paid deductions in the current period and all Commonwealth paid deductions YTD.
10. Your paycheck totals are in this section, including your year-to-date gross and tax amounts.
11. Leave Balances shown are as of the last leave accrual. Actual Leave Balances are available to view on your Self-Service Timesheet.
12. Your direct deposit distribution is shown here (Note: Your bank account number is not shown here)

Select the Prior Pay Adjustment link to access the adjustment details processed within the desired Check Date.

If you do not have a prior pay period adjustment, a Prior Pay Adjustment link will not appear.
Your Prior Pay Adjustment details will display in a new window.

Image showing PPA fields described below


Understanding your Prior Pay Adjustment details:

Area

Description

Earnings Begin Date

Indicates the Earnings Begin Date of the pay-period for which the adjustment was paid.

Earnings End Date

Indicates the Earnings End Date of the pay period for which the adjustment was paid.

Earnings Description

Indicates the type of the adjustment.

Hours

Indicates the hours of the adjustment.

Rate

Indicates the rate being used to calculate the adjustment.

Total

Indicates the total of the adjustment.

Download to Excel button

Allows you to download the prior period adjustment details into the Excel spreadsheet.

Search button

Allows you to search for a specific adjustment detail.

Verifying Your Leave Balances

You have the ability to log in to Employee Self-Service to view a copy of your timesheet in order to verify your leave balances.

Important Reminders:

  • You are not able to edit the leave balances.
  • Leave balances will display in ‘real time’. If leave time is present for the current week, the balances will reflect those hours used. The leave balances will display the up-to-date remaining time available for use.
  • If you have any questions or need assistance regarding your leave balances, please contact the MassHR Employee Service Center (ESC). If your Agency is not supported by the ESC, please contact your Agency Human Resources/Payroll Department for password reset and questions about leave balances.
Step Action
1. Log in to Employee Self-Service with your user ID (employee ID) and password.
2. From the Employee Self-Service homepage, select the Timesheet tile. You will arrive on the Timesheet page.
3. Below your timesheet, select the Leave/Compensatory Time tab to view Personal, Sick, and Vacation leave balances, complete with Comp (if applicable). Note: This tab only shows current leave balances.
4. If you need to correct something regarding your leave balances, please contact the MassHR Employee Service Center (ESC). If your Agency is not supported by the ESC, please contact your Agency Human Resources/Payroll Department for questions about leave balances.

Help Us Improve Mass.gov  with your feedback

Please do not include personal or contact information.
Feedback