DCMS Contractor Payroll/Workforce Reporting Guide
DCAMM’s Contractor Management System (DCMS) is the agency’s platform for MBE/WBE and other Contract Compliance, Certified Payroll and Workforce Reporting. Firms providing Construction services (Prime Contractors/Subcontractors), as well as, firms providing Design services (Designers) on DCAMM projects are responsible for using the system to self-report workforce information into the system.

Introduction
Once your firm’s contract is synced to the Payroll/Workforce Reporting portion of DCMS (hosted by LCPtracker), payroll submittal can begin. Training and support are offered by the system vendors and are directly accessible upon login, in addition to this user guide and recorded webinars available on DCAMM’s website.
DCAMM construction projects have workforce utilization percentages of 15.3% for minorities and 6.9% for women. In addition, the Commonwealth's Prevailing Wage law requires weekly submission of payroll information on public construction projects.
The DCMS Payroll/Workforce Reporting System enables Prime and subcontractors to report workers employed on-site at DCAMM projects via weekly on-line submission of payroll reporting. Workforce data is also collected from the submitted payroll reporting thus eliminating the need to submit separate reports.
The process for entering weekly Payroll Reports consists of several steps:
- eSignature Setup (only done the first time you enter the system)
- Employee Setup (only done once for every new employee working on the site)
- eDocument Setup – OSHA and/or Apprentice Cards (only done once for each employee)
- Define a Work Order/Task (done once per contract, if applicable)
- Certified Payroll Creation/Upload (weekly)
Please add dcamm@gob2g.com and noreply@lcptracker.com to your address book or safe list to ensure delivery of DCMS emails.
eSignature Setup
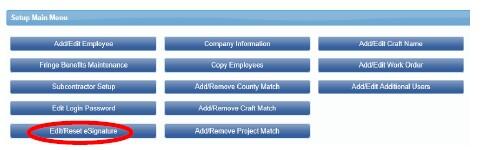
The first thing you must do once you log-in to DCMS Payroll/Workforce Reporting is create an eSignature under the “Set Up” tab. Next click on the “Edit/Reset eSignature” button.
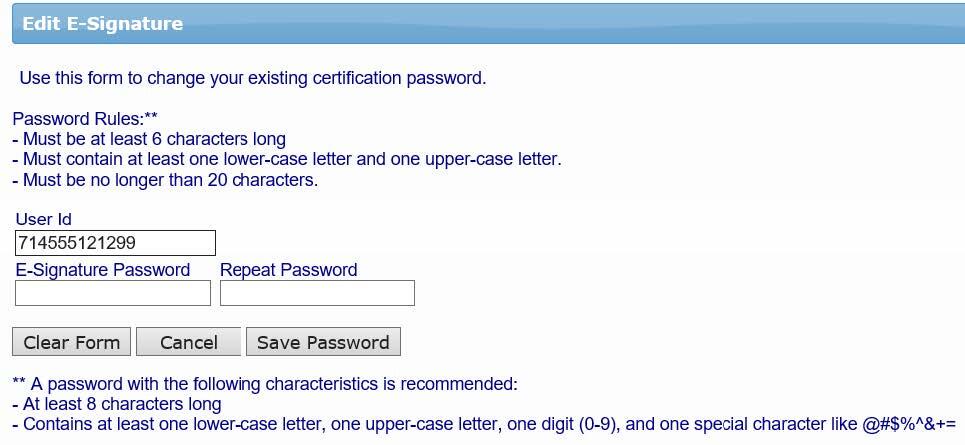
You will be prompted to enter in a password twice, and click on “Save Password”. This password can be the same one you use to login to the system. Do NOT share your eSignature with anyone. If you have multiple people using the system, set each person up individually under the “Add/Edit Additional Users” button. Your eSignature allows you to sign a legal document (the certified payroll report).
Employee Setup
Your next step is to Set Up Employees under the same “Set Up” tab used in step 1. Click on the “Set Up” tab to start.

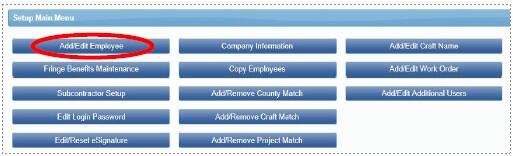
Once in the Setup Main Menu, click on the “Add/Edit Employee” button.
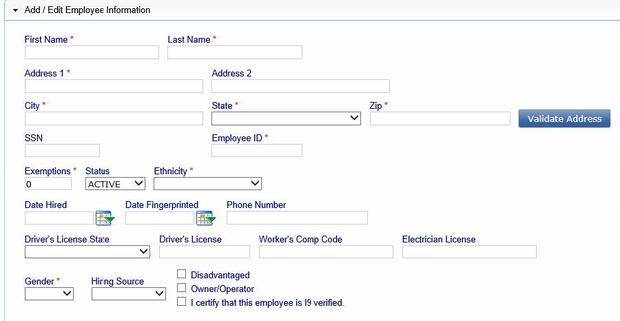
Once in this area, all fields marked with a red asterisked (*) are required. You will not be able to save your employee record if they are not filled out. Following is a comprehensive list of all fields to be included:
- First name
- Last name
- Address 1
- City
- State
- Zip
- Employee ID (The employee ID is the initials of the employee (First and last names only), and the last two digits of the social security number. (Example: John Smith SS# 123-45-6789 - The employee ID would be: JS89)
- Exemptions (Leave this as a zero)
- Ethnicity
- Gender
- I-9 Verification is required - check box
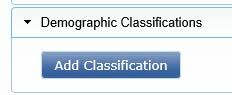
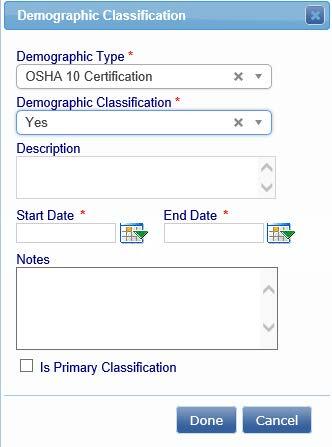
The next required section is for Demographic Classification information. Click on the “Demographic Classification” button.
A separate field box will pop up. Click on the first drop-down list, titled “Demographic Type”. You will be prompted to choose either “OSHA 10 Certification” or “Veteran Status”. When choosing “OSHA 10 Certification”, you will then be able to click on the second drop-down list, where your choices for “Demographic Classification” are now “Yes” or “No”. Make the appropriate choice, enter the applicable start and end dates if prompted, and click on the “Done” button.
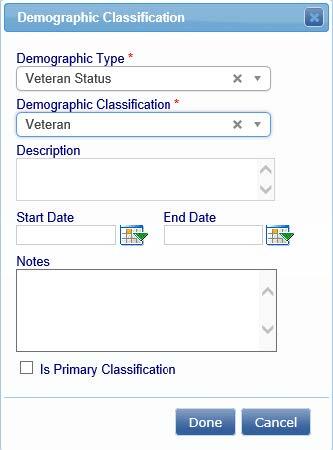
You will need to repeat this process one more time to choose the appropriate response for “Veteran Status”. The choices from the second drop-down list will now be “Not a Veteran”, or “Veteran”. Once you have chosen your response, click on the “Done” button.
If the employee is an apprentice please ensure the appropriate fields are completed in the Apprentice Information section. The designated Prime Approver must approve your apprentice to utilize the correct payroll classification. If you do not enter the appropriate information required, they will not be able to approve the apprentice. At a minimum, you must include:
- Apprentice ID
- Apprentice percentage (i.e., 50%, 75%, etc.)
- Apprentice period, step or level (i.e., 2nd period, 1st step or 5th level)

You are now done entering all the required employee information.
For more detailed information on this section, see Training Materials > Contractor Support Documents > ADD/EDIT EMPLOYEES

eDocuments Setup
Construction employees will need to upload the applicable OSHA documentation, for each employee, in the online filing cabinet called “eDocuments”. All apprentice documentation must be uploaded, if applicable.
- Click on the “eDocuments” tab
- Click on “Upload Documents”
- Select project from drop-down list
- Select document type
- Add a document date (current date)
- Add an expiration date, if applicable
- Select employees name from the drop-down list
- Upload file
- Enter eSignature
- Click the "Save" button

For more detailed information on this section, see Training Materials > Contractor Support Documents > eDocuments
Define A Work Order “Task”
Bundled Contracts aka Blanket/Master Agreements, i.e., House Doctor, requires Task set up prior to submission of first report. Refer to training manual under Admin Support Documents for further instruction on Defining a Work Order.
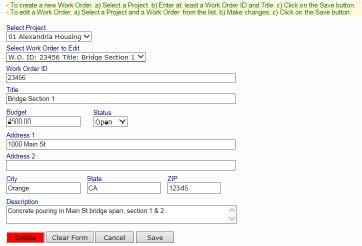
The prime contractor may define the work orders. Simply go to Set Up > Add/Edit Work Order to open form below.
- Naming Conventions
- Work Order ID: DCAMM Task No. and/or DCAMM Project No.
- Title: DCAMM Project Name
- Status – indicate open when each Task is to begin, close when each Task is complete.
- Budget value is not required.
Certified Payroll Report
Certified payroll reports (CPRs) can either be entered manually or uploaded to the system if the contractor is using compatible accounting software.
To enter Certified Payroll Reports manually:
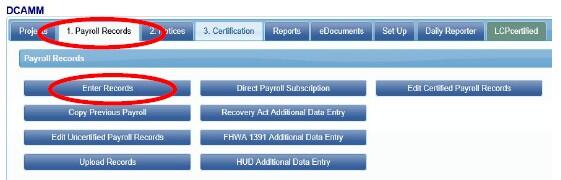
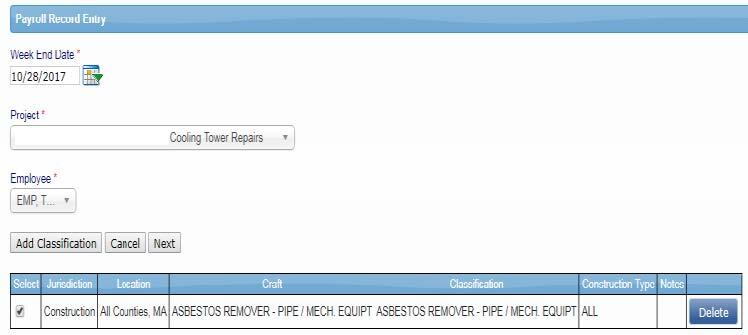
Click on the tab “1. Payroll Records,” then click on the “Enter Records” button.
- Select the week ending date
- Choose your project from the drop-down list
- Choose your employee from the drop-down list
- Click on the “Add Classification” button to choose your employees classification (if you have done this before, the system will remember what you choose previously. If your employee’s classification is not in the list, please contact your CO at DCAMM. Do not simply choose an existing classification to make the process easier.)
- Check the box under “Select”, then click the “Next” button
- Enter employee wage information
Next, check for any error notices via the tab “2. Notices.” If you have any errors in your employee records, you will find your employee(s) listed here. Click on the “Edit” button next to their record, and read the instructions under “Notices” on the bottom of the page. Once, you have resolved these, you will be able to re-save the record.
Finally, click “3. Certification” tab to submit the report to DCAMM.
- Select your project from the drop-down list
- Enter in the last date of the month of this report for your week end date
- Enter the number of this report for the payroll number
- Enter your name
- Enter your title
- Click on the “Next” button


To complete the SOC, you will need to complete the following steps:
- Enter the number of apprentices on your certified payroll report, if applicable. If none, please enter a “0”.
- Use your eSignature to sign and certify this form.
For more detailed information on this section, see Training Materials > Contractor Support Documents > Manually Entering Payroll Records
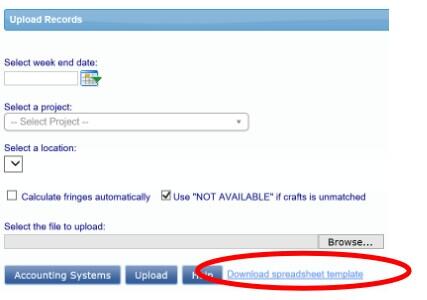
To Enter Certified Payroll Reports with an Upload
The system allows for the upload of payroll information from compatible accounting software.

Once you click on the “1. Payroll Records” tab, you will have two options for upload. Click on the “Upload Records” button next. You will first select your week end date for your CPR, and then select your project from the drop-down list. To see your first option, click on the “Accounting Systems” button. A list like the one to the left will pop up. If you have any of the accounting systems listed, simply contact your representative from that company let them know that you are utilizing LCPtracker for your Certified Payroll Reports, and ask to receive a weekly upload file of your normal payroll.

If you do not use one of the accounting systems listed, you have one more option. You can click on the “Download spreadsheet template” link provided next to the “Accounting Systems”, “Upload” and “Help” buttons. The excel file includes specific instructions for use. For help with this option, contact the Support Desk at LCPtracker via email (support@lcptracker.com), live chat or phone (714) 669-0052 Option 4.
For more detailed information on this section, see Training Materials > Contractor Support Documents > UPLOADING RECORDS
Congratulations! You have now submitted your first Certified Payroll Report electronically to DCAMM.
For a more comprehensive guide to the different sections of DCAMM’s Payroll/Workforce Reporting System please feel free to browse and utilize the job aides located in the system by selecting the Training Materials link after you have logged in.