What is an accessible PDF?
For a PDF to be accessible, it must be a “tagged” PDF. Tags in a PDF identify the structure of your content, what the purpose of non-text content is, and determine the order in which the content is read for a screen reader user. If your source document is a simple text document in Word, and properly exported to PDF, it should contain appropriate tags. If the content of your document is heavy in graphics, tables, or has a fancy layout like a flyer or infographic made in PowerPoint or InDesign, you will need to open that document with Adobe Acrobat Pro and ensure proper tags and reading order.
Considerations before you start
Before remediating a PDF for accessibility, it is important to ask the following questions about your document.
Can this document be archived?
Is your document a previous announcement or decision, or is it outdated in general? If you must keep a document available for legal and reference reasons, but it is no longer relevant for everyday use, you can archive your document. Documents that are no longer needed and clearly marked as archived generally do not need to be updated to be accessible, unless there is a specific request for an accessible copy of that document.
Documents that are outdated and not required to be kept available can be removed from mass.gov and stored in the State Library archives if it is a publication, or in the State Archives if it is an internal or administrative document.
Learn how to archive your old documents.
Can this be made into a page on mass.gov instead?
Important Note: This will be the most accessible and least time consuming way to deal with an inaccessible PDF.
If your document is informational or a form, is it something that could be made into a page on mass.gov? This will always make a document more accessible, and makes it easier to track information that may need to be updated over time. This also makes a form much easier for someone to fill out, and an online form can be made more accessible than a PDF form.
Does a source document exist?
An accessible PDF always starts with a good source document. If you have a PDF that is not accessible, it is almost always going to be easier to work on fixing the source document than it will be to remediate a PDF from a bad source. If you can obtain the source document in Word format, you can greatly improve accessibility by making sure the Word document is accessible.
Learn how to make an accessible Word document.
If the PDF was scanned in from a paper document, and does not have a source, there is often a lot of work that will go into remediating that PDF. It will likely take less time to recreate the document as a page on mass.gov, or as a Word document and export an accessible PDF, than it will be to remediate it in Acrobat Pro.
You can attempt to export a PDF to Word format to recreate a source document, by selecting File > Export To in Acrobat Pro. Then you can make any needed updates in Word, and re-export to PDF. Depending on the quality of the original PDF document, the output quality to Word will vary.
Is this the final version of the document?
Acrobat should not be used as a document editing tool, but as a publishing tool. If you go through the process of remediating a document for accessibility, and then decide to change a few words in the document, it is likely you will have to perform all of the remediation steps again. Be sure that this is the final version of the document that is ready for publishing before performing these steps.
The quirks of Acrobat and versioning
Acrobat is known to have quirks and issues from time to time. Be aware that you will run into an issue at some point with Acrobat when remediating a PDF. To prepare for this, versioning is an important safety net when remediating. Versioning is the process of saving your document multiple times as copies throughout the process after successful steps, so that if you run into an issue you don't lose much work. Whenever you begin working on a document, make a copy first and work on the copy. Then as you complete a step successfully that took some time, use the File > Save As... feature periodically to save it as Document v2.pdf, Document v3.pdf, and so on. It may seem like an extra step to do this, but it could end up saving you a few hours of work if you run into an issue down the line.
Configuring Acrobat Pro
There are a few items to configure so you can easily access the tools you will need to remediate a PDF for accessibility.
Disable the New Acrobat Experience
There are currently some limitations for accessibility in the latest update of Acrobat Pro. It is recommended to disable the New Acrobat Experience until those issues have been resolved. To do this:
- Select the View Menu.
- Select Disable new Acrobat.
Add the accessibility tool to the tools pane
The right hand tools pane in Acrobat contains different PDF editing tools and functions. To add accessibility tools to this pane:
- Select the More Tools button at the bottom of the right-hand tools pane.
- Scroll down in the list of tools until you find Accessibility, then select Add.

Practice Resource
-
Open PDF file, 81.22 KB, Practice PDF for Remediation (untagged) (English, PDF 81.22 KB)
Run the "Make Accessible" Action Wizard
Important Note: Only use the Make Accessible Action Wizard if you are remediating a PDF that is either untagged or that you wish to re-tag. If an accessible source document was used to create the PDF, skip these steps and run an Accessibility Check as the first step.
The "Make Accessible" Action Wizard walks you through multiple initial steps to make your document more accessible, like setting a document title, detecting form fields, adding alt text, setting tab order, and automatically tagging your document if it isn't already tagged.
To run the wizard:
- Select View > Tools > Action Wizard > Open. The Actions List pane opens.
- Select Make Accessible from the list. Under Files to be processed: you will see your document listed.
- Select Start.
- Add a title, subject, and author. Optionally, add keywords if needed. Then select OK.
- Set the appropriate document language and choose Output: Editable Text and Images in the Recognize Text panel, and select OK.
- Skip this step if your document is already tagged. To skip, select the next step in the action wizard pane.
- If your document contains form fields, select Yes, Detect Form Fields from the prompt. If not, select No, Skip this Step.
- Set the appropriate language in the Set Reading Language panel, and select OK.
- A prompt will appear that Acrobat will detect all figures in this document. Select OK.
- If any items in the document are missing alt text, Acrobat will highlight items and prompt you to enter alt text. Enter text descriptions, or mark the items as decorative if appropriate.
- The Accessibility Checker Options panel opens. Uncheck the box for Create accessibility report, and select Start Checking.
This process will add tags to the document automatically if needed, so you will no longer have an untagged PDF. PDFs exported from a properly formatted document in Word will already have tags, so using the Recognize Text wizard will override those tags. It is still important to always check the tags for accuracy as explained in the next section.
PDF Tagging (Simple text documents)
Important Note: This is not a process that should be done to a document that was exported from Word as an accessible PDF, as this will remove the accessible structure that Word has added. If you have used the "Make Accessible" Action Wizard, tags have already been added to the document as well. This is meant for remediating a PDF when you cannot correct the source document in Word. This process focuses on documents in a plain linear layout: text documents that include only headings, paragraph text without columns, bulleted or numbered lists, and inline images.
- Open your PDF in Acrobat.
- Select the Accessibility button in the Tools pane. The right-hand Tools pane will expand to show accessibility tools.
- Select the Autotag Document button.
Note: If your document already contains tags, a confirmation dialog will appear asking you if you want to update tags on the document. If you do not want to remove the structure in the document, you can select View accessibility tags to access the Accessibility tags tree.
The Accessibility tags tree will open in the Left Task pane. You can select a tag to see what it corresponds to in your document as shown in the following image.

Accessibility tags consist of things like Document, Section, Heading, and Paragraph tags. Many of these tags will expand to show different elements within them, such as links or text. Some elements like links will have more than one inner element. In the case of a link, it is made up of two elements: the link text, and the reference to the URL.
Typically, if your document is simple content, the Autotag tool will add the appropriate structure to your document, and you will not need to edit the tags.
However, if you find that an element has been tagged that shouldn't be there — like a small decorative symbol, graphic, or line, — you can right click the tag and select Delete Tag. If an element should be tagged, but was identified incorrectly, you can fix it by doing the following:
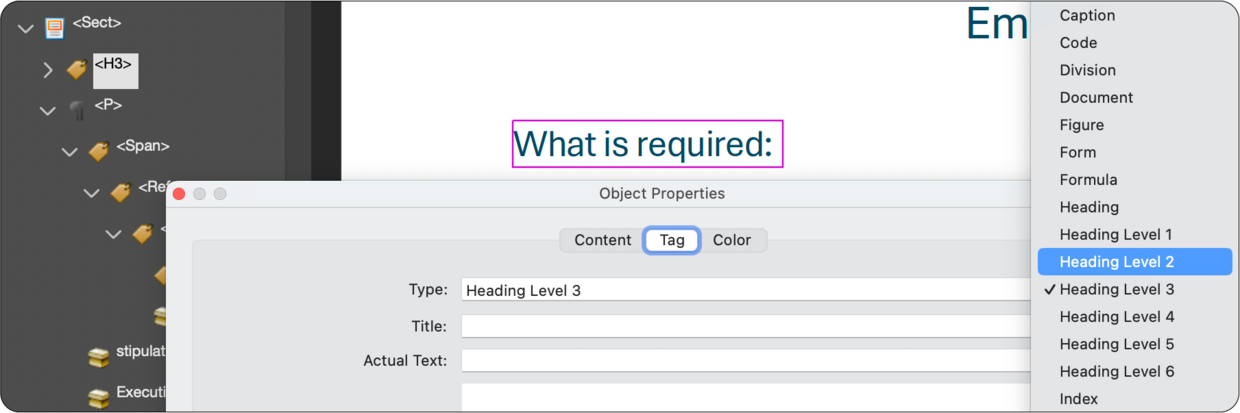
- Right click the tag in the left hand panel, then select Properties...
- The Object Properties panel opens. Select the dropdown next to Type.
- Choose the correct type for the element.
- Select the Close button.
Combining tags
There are times when the Autotag process may mistakenly separate one group of items into more than one item. This occurs most frequently when a list or Table of Contents spans across a page break to an additional page. Tags can be combined by dragging.

To fix this:
- View the Accessibility tags tree.
- Expand the tags until you find the two parent tags to combine.
- In the screenshot, that would be the two <L> tags (<L> = List)
- Expand both parent tags so that the child tags are exposed.
- In the screenshot, that would be the <LI> tags (<LI> = List Item)
- Select and drag the second group of child tags in to the first parent tag, below the child tags that are already in that parent tag. Be sure the tags you are dragging have the same indent level as the other child tags.
- In the screenshot, the second group of <LI> tags would be dragged into the first parent tag labeled <L>
- Delete the empty parent tag that is left behind.
- In the screenshot, the bottom highlighted <L> tag would be deleted.
Run the Accessibility Checker
After tagging your document, scan for any additional issues by selecting the Accessibility Check button in the right-hand Tools pane. This will open the Accessibility Checker Options panel. You can uncheck Create accessibility report at the top of this panel, unless you want to save a detailed output of document issues. Select the Start Checking button to begin.
The Accessibility Checker will open in the left-hand Tasks pane. If there are any issues present in the document, the number of issues will appear along side each category.

In this image example, there are three issues in the document. two are represented with a question mark and a note of "Needs manual check." One is marked with an X, and a note of "Failed."
Items that need a manual check, like Color contrast and Logical Reading Order, will always be marked as an issue to remind you to perform a manual check.
The one failure is that there is no title for the document. This title is not referencing the first heading on the page, but metadata in the document to define the title. You can right click on an error like this and choose Fix to bring up a panel to make edits.
If you are unsure what the error is, you can right click an item in the list and choose Explain, which will open a page on Adobe's website to provide a definition of the problem.
Reading order and graphics
The Reading Order panel in acrobat gives the the ability to reorder items in your document for a screen reader. It also must be open to edit alternate text for graphics and tables.
If your document contains graphics that are not inserted as inline graphics in Word, you will need to adjust the reading order in your document, so that the alt text of those graphics is announced by screen readers in the correct order. If your document was created in Adobe InDesign, some reading order will come over to a PDF, but it should still be checked. If your document was created in PowerPoint, you will need to correct the reading order in Acrobat.
To view the reading order, select the Order button in the left hand navigation pane. The Order opens displaying a list of all of the items that Acrobat has automatically detected in the document. In the document pane, you will also find boxes around each item in the document that are numbered based on reading order, and any alt text that is assigned to images from your source document, or automatically generated by Acrobat if you had not assigned any alt text in the source document.

Adjusting the reading order
A list of items is available for each page of your document in the Order list. You can drag items around in this list to adjust reading order if any items are in the incorrect order. This will be common if your source document contained any floating text boxes or graphics. Reorder the list until all of the items in the document are numbered in correct reading order.
Fixing incorrectly identified items
You may find that headings may be combined with text, where a single box is around both a heading and a paragraph. You may also find that background graphics like shapes may be identified as a "Figure." If this is the case, you can fix this in the Order Panel.

At the top of the Order list, select the Options button icon, then select Show reading order panel.
The reading order panel opens.

Select an item in your document by double clicking it, or by clicking and dragging a box around the item in the Document pane. The Reading Order panel shows different attributes you can assign to that item. In this case, text in the Document pane is highlighted that should be a Heading 2. Select Heading 2 in the Reading Order panel to apply this change. Continue to highlight objects in your document and select the appropriate button in the Reading Order panel, until all items in the document are correctly identified.
Removing decorative and background graphics from the reading order
In some cases you may find a background graphic is identified as a "figure" when it is something that should not be in the reading order at all because it is decorative. If this is the case, you can remove this item from the reading order in one of two ways:
- Select the item in the Document pane by clicking the reading order number in the upper left corner.
- Select the Background/Artifact button in the Reading Order panel
Or
- Right click the reading order number in the upper left corner of the highlight box on the item.
- Select Delete Selected Item Structure.
Note: Delete Selected Item Structure only appears as an option in the Document Pane when the Reading Order panel is open.
Editing alt text on graphics

To edit the alternate text of a graphic, right click the reading order number at the top left of the graphic, then select Edit Alternate Text.
The Alternate Text panel opens. Enter a description in the Alternate Text box, and select Ok.
Tables
Before editing a table, make sure the Reading Order panel is open first. Having the Reading Order panel open allows you to access table and cell properties.
With the Reading Order panel open, right click the reading order number in the corner of the highlight box around the table. Select Table Editor from the context menu.
An overlay identifying cells will appear on the table. You will find the letters TH or TD in the corner of each cell. TH means Table Header, and defines the header of the column or row. TD means Table Data, which defines that each of those cells are data that fall under the header of the column and row. This is important for screen reader users, as a screen reader will announce those headers with each entry of cell data, so a user who is listening to the table can relate each cell to the appropriate header.

In the above example table, the city names of Boston and Worcester should be assigned as row headers so that the number values in the table are announced with "Boston 2023, Boston 2024" defining them. Without this, Boston will not announce as a row header, it will simply be considered another data cell under "City."
To change a cell to a header:

Right click the TD button in the top left corner of the cell. The Table Cell Properties panel opens. Under Type, select the Header Cell radio button. Select OK.
Repeat this process for any additional cells in your table untill all cells are appropriately marked as headers or data.