Introduction
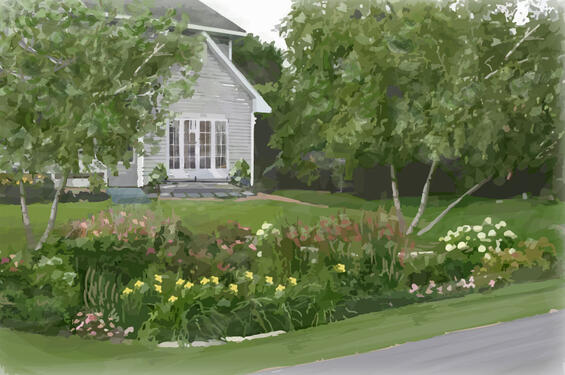
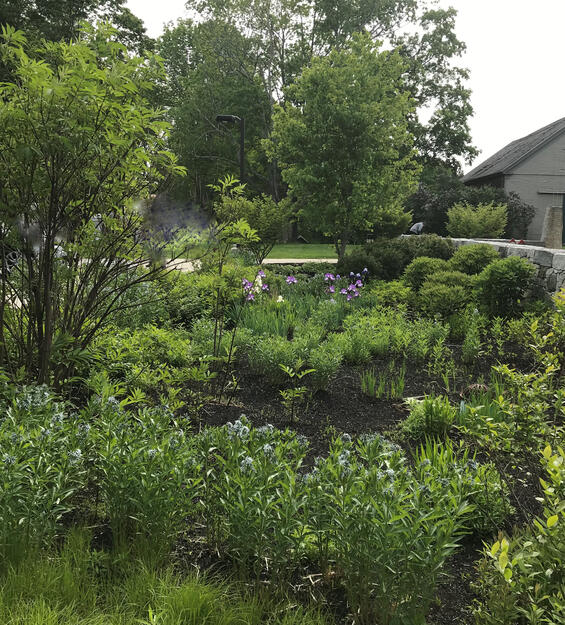
A rain garden planted along the road collects and filters stormwater before it runs off and drains to local waterbodies.
Rain gardens are specially designed and planted depressions in the ground that collect, filter, and treat stormwater. These slightly sunken gardens allow collected water to be taken up by plants or slowly infiltrated (i.e., filtered into the ground), reducing the amount of water running off site. Rain garden soils—which are typically amended with mulch and sand to promote proper moisture levels and drainage properly—also remove pollutants (including metals, nutrients, sediments, oils/grease, and organic matter) before they reach groundwater or flow to coastlines and local waterbodies. By preventing stormwater from running into roads, storm drains, and waterways, rain gardens may also help reduce localized flooding and erosion. Rain gardens are an excellent choice for most properties and are a potential do-it-yourself project with many options for shape, plantings, and size (even small rain gardens provide great benefits). Planting a rain garden with flowering and fruiting plants, shrubs, and trees will also provide visual interest, as well as food and habitat for wildlife (see Native Plants for Rain Gardens in Massachusetts for recommendations, including options for coastal sites).
Rain gardens can be strategically located to collect and treat water flowing from roof downspouts, paved areas, or sump pumps, helping to reduce drainage problems and soggy areas in your yard—and because rain gardens more effectively capture and absorb rainwater than lawns, they make an excellent runoff-control alternative for yard areas. Rain gardens do require an appropriate soil depth to effectively treat stormwater, so they may not be suitable in areas with poorly drained or clay soils, ledge, or a high groundwater table. Be sure to follow the guidelines in this fact sheet for siting a rain garden to ensure success and avoid harmful effects.
Impacts to Neighboring Properties - Stormwater management practices must be designed to responsibly manage runoff from your property without transferring problems to neighboring properties, roads, and municipal drainage systems. Rain gardens, vegetated swales, and other techniques that collect and hold stormwater have the potential to overflow “muddy” water in major storms. When designing these options, be sure that there is enough area on your property to effectively capture and treat any overflow onsite. Management practices that redirect or divert stormwater—such as disconnecting/redirecting downspouts or re-grading the land surface—can similarly cause flooding problems in roadways or neighboring yards, basements, or leach fields (potentially causing a septic system failure). These projects must therefore be designed to ensure that no additional stormwater is transferred offsite. Carefully following design guidelines in the Stormwater Solutions for Homeowners fact sheets will help you avoid impacts to neighboring properties. If in doubt about offsite impacts, consult a professional, such as a civil engineer or landscape architect.

For properties near beaches, coastal banks, dunes, floodplains, rivers, salt marshes, wetlands, and other “resource areas” protected under the Massachusetts Wetlands Protection Act,* rain gardens can be particularly beneficial for helping to reduce stormwater impacts. Projects directly next to or within these resource areas, however, are likely to require a permit through the local Conservation Commission. To maximize benefits and avoid impacts to resource areas and adjacent properties, permitted projects must be properly designed, installed, and maintained. For example, rain gardens near coastal banks should be sited so there is no potential for infiltrated water to break out on the bank face and cause erosion problems. Also, a sufficient depth of soil must be maintained between the base of the rain garden and the water table to allow for proper filtration and treatment. Rain gardens must not be sited within wet resource areas, such as marshes, swamps, bogs, rivers, streams, ponds, and vegetated wetlands. During the construction of the rain garden, impacts must be minimized by providing erosion and sedimentation controls. The Massachusetts Department of Environmental Protection (MassDEP) Structural BMP Specifications for the Massachusetts Stormwater Handbook (Volume 2, Chapter 2) (PDF, 6.5 MB) provides additional information and design requirements for stormwater control projects proposed in wetland resource areas and buffer zones. Homeowners are encouraged to contact their local Conservation Commission before undertaking any work to determine whether a resource area exists, what permitting requirements may apply, and how to avoid impacts.
*MGL Chapter 131, Section 40 and corresponding regulations at 310 CMR 10.00.
Size and Location for a Rain Garden
Even small rain gardens capture and treat stormwater, so a project of any size can be beneficial on your property. Technical Specifications for Calculating Rain Garden Size provides some advanced, optional steps for calculating a specific rain garden size for treating runoff. As a general rule, rain gardens should be at least 1/8 to 1/3 the size of the drainage area (i.e., the area that drains runoff to the rain garden) and 3-8 inches deep to fully treat stormwater. (The specific size needed to fully treat stormwater will vary depending on your soil type and slope, which affects how well water infiltrates into the ground—see the last two bullets of this section or Technical Specifications for details.) When choosing the rain garden location, follow these steps:
- Find places where rain or runoff can easily be collected - Look for relatively flat areas in your yard that are downslope from roof downspouts and impervious surfaces (i.e., surfaces that do not allow water to filter into the ground, such as rooftops or driveways). Rain gardens should be located at least 10 feet away from home foundations and at least 50 feet away from septic systems or wells. If necessary, you can more efficiently direct water to the rain garden by adding extensions to downspouts or piping water underground. Directing water through rocky or grassy drainage swales is another option to convey water while providing additional infiltration (for more information on swales, see Stormwater Solutions for Homeowners Fact Sheet: Vegetated Swales). Be sure that any overflow from the rain garden will not run onto neighboring properties or roadways. Also, be sure that all components of the project are located on your property and not the road right-of-way.
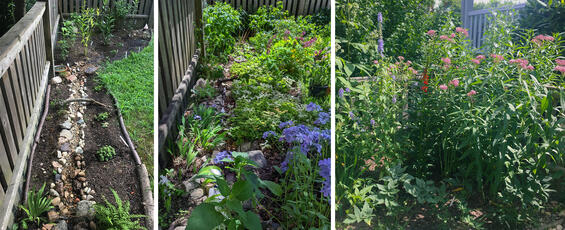
Water from a roof downspout runs through a rocky swale and into this small residential rain garden. The three photos show the sequence as native plants grew and filled in over time.
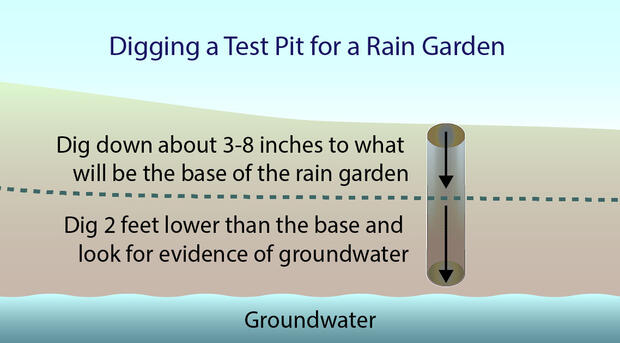
- Check for groundwater - Generally, at least 2 feet of soils are needed between the bottom of the rain garden and the water table to effectively filter out pollutants and protect groundwater. To check if the water table is too high, wait until the groundwater is normally at its highest (in the spring months, typically April through May), but not immediately after a heavy rain. Then, dig a hole 2 feet deeper than the planned base of your rain garden. Leave the hole open for at least an hour, and if water seeps in or if you see soil mottling (a blotchy pattern of red, orange, or yellow that differs from the rest of the soil, indicating prolonged soil saturation from groundwater), gley (a sticky, waterlogged soil that is a green-blue-gray color), or organic muck, the location is unsuitable for a rain garden. An alternative to digging a hole is to drive rebar or a pipe into the soil and then pull it out and check if it is damp (like using an oil dipstick). If signs of groundwater are found, you will need to try another location.
- Ensure the water drains properly - A rain garden will not drain properly when located too close to the groundwater level, in an area with clay or silty soils, or in a low spot that tends to collect standing water. (Please note, however, that placing a rain garden directly uphill from soggy, low spots can be ideal.) You can assess the drainage rate by digging a hole at least 1-2 feet deep (again, this is best done in the spring, and you can use the same hole you dug to check for groundwater). If water seeps into the hole within an hour, the site does not drain properly. If the hole stays dry, fill it with water and then time how long it takes the water to seep into the ground. If it drains in less than 24 hours, the location properly drains. If it takes more than 24 hours or does not fully drain, try another location or amend the soil to improve drainage (see Rain Garden Base for additional information on amending soils).
- Determine the soil type - Soil type also affects how well the rain garden will drain. A “ribbon test” can be used to determine soil type—dig down below the topsoil (since organic matter can interfere with results), grab a handful of soil, roll it in a ball, and squeeze. If the soil sticks together and forms a clump (or “ribbon”) more than 1.5 inches long, it is clay soil with low infiltration rates. If it forms a weak ribbon that breaks at a length of approximately 1.5 inches or less, it is a silty soil with medium infiltration rates. Sandy soil, which has high infiltration rates, will not form a ribbon at all. The type of soil and its infiltration rate will help determine whether soil amendments are necessary and can be used to help determine the ideal size for a rain garden.
Rain Garden Base
Follow these instructions to build the rain garden base:
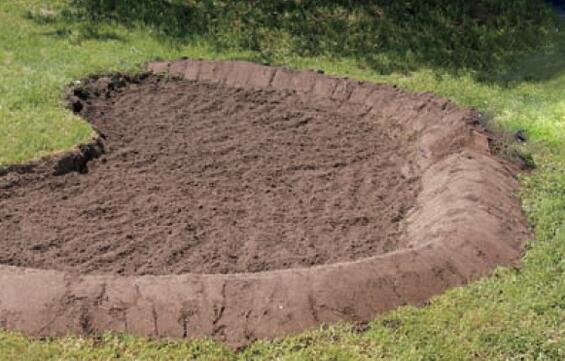
- Dig/excavate the base - Mark the perimeter of the rain garden. Then remove the sod, grass, or other vegetation and dig out the rain garden area to a depth of 3-8 inches. For larger rain gardens, an excavator may be needed to remove soil or regrade the ground surface. (When using heavy equipment, be careful to avoid compacting the soil, which reduces infiltration and limits the growth of plants.) To minimize potential erosion, ensure that the rain garden base is level so the water spreads out and drains evenly. You may also grade the rain garden base so that it pitches slightly to the center to help avoid washouts and erosion along the edges.
- Amend the soils - Rain garden soils need to retain enough moisture for plants to grow but also provide enough drainage so that water does not pool for extended periods. For ideal soil conditions, use 50-60% sand, 20-30% topsoil, and 20-30% shredded bark mulch—blended together as much as possible. (Triple shredded mulch should be used because it can be incorporated into the soil much faster than coarser mulch, which helps reduce compaction and improve water infiltration.) Mixing compost with rain garden soils is typically not recommended due to compost’s high phosphorus content. If the ribbon test showed that your soils are high in clay and silt, dig down an additional 6-18 inches and replace the soil with a layer of gravel or crushed stone covered with the recommended mix of sand, topsoil, and shredded mulch. (Once these materials are added, you can perform another drainage test to see if water infiltrates within 24 hours.) In some cases, you may be able to simply add amendments (such as sand) to increase the infiltration capacity of the rain garden. Soils can also be topped with a layer of bark mulch (either before or after planting) to help retain moisture and nutrients while preventing erosion and compaction. (Triple shredded mulch is also recommended for this top layer since the finer fibers interlock, helping the mulch stay in place and providing better weed control; do not use light-weight wood chips or straw because they are easily washed away.)
A berm built around the downhill sides of a rain garden helps hold stormwater. The rain garden soils have been amended with sand and a planting soil mix.
- Build a berm - A berm (a raised barrier) built on the downhill side of the rain garden is an option to help hold water and give it time to seep into the soil. The soil removed when digging the rain garden base can be used to build the berm. If a berm is used, it should be no more than 6-8 inches high—just enough for stormwater to pond to improve infiltration into the ground.
- Prevent erosion - To help prevent runoff from washing out the mulch or soil during heavy rain, the rain garden should be relatively level or only slightly sloped and contained by a berm. In addition, the mulch used should be finely shredded, and the ground surfaces should be well vegetated. During construction, you may want to install a temporary erosion-control blanket made of natural fibers over the rain garden to protect the soil until the vegetation becomes established (the natural fibers in the blanket disintegrate in 6-24 months, and the root systems of the plants take over the job of stabilizing the site; for details, see CZM’s StormSmart Fact Sheet 5: Bioengineering - Natural Fiber Blankets on Coastal Banks). Optional approaches for slowing the speed of runoff flowing into the rain garden include spreading a layer of crushed stone on the uphill side of the area or creating a small stone drainage path (or drainage swale) from the source of the runoff to the rain garden.
Rain Garden Plantings
Follow these guidelines to improve success of rain garden plantings:
This rain garden was planted with a variety of native trees, shrubs, grasses, and perennials to tolerate local conditions, provide wildlife habitat, and control runoff.
- Species selection and placement - Choose hardy native species, which are well adapted to local conditions and typically do not require the use of chemical fertilizers and pesticides. Ideally, your rain garden should include a variety of plant species to ensure survival and diversity. All plants will need to tolerate some fluctuation in water levels and be able to withstand both wet and dry conditions (including droughts when soils drain completely for extended durations). Wet-tolerant plants should be placed in the wettest locations, such as in the deepest areas and where the water enters the rain garden. Plants better suited to moderate moisture or dry conditions should be placed on the edges and higher areas of the rain garden. To reduce initial planting costs, younger plants can be used—but since young plants do not necessarily thrive in standing water, for the first year you may need to dig out a small opening in your soil berm to allow water to drain. Rain gardens may also be planted with native grasses and mowed periodically. (Rain gardens should be mowed infrequently to prevent soil compaction and to allow the growth of longer grasses and deeper root systems, which more effectively treat stormwater.) Native Plants for Rain Gardens in Massachusetts lists plants that are appropriate for different moisture levels. For additional plant options, see the UMass Extension Rain Gardens fact sheet.
- Aesthetics - By planting trees, shrubs, perennials, and grasses that offer color, texture, light, and movement, rain gardens can be a source of beauty in your landscape. Planting a mix of species with different heights, forms, and flowering times can enhance appearance. Other useful design tips include placing taller flowers, shrubs, or trees behind shorter ones and arranging the plants in odd-numbered groupings. Spread plants out during the initial installation to give them room to grow—though it might look sparse at first, the plants will fill in and thrive throughout the years. Before digging, place the plants on top of the ground and move them around to find the best configuration. You can also design the shape of your rain garden to enhance the landscape, such as by creating a striking linear shape along a roadway or a more traditional round or kidney-shaped garden as landscape focal points.
- Planting instructions - Plant each species at the appropriate time of year (generally spring or fall when more moisture is available) and follow the specific planting and care instructions.
Native Plants for Rain Gardens in Massachusetts
The native plants listed in the following tables are good choices for rain gardens. The plants are categorized by their suitability for high-moisture or moderate moisture/dry areas.
Perennials and Grasses
| High-Moisture Areas | Moderate-Moisture or Dry Areas |
|---|---|
| Blue Flag Iris (Iris versicolor) | Beebalm/Wild Bergamot (Monarda fistulosa) |
| Cardinal Flower (Lobelia cardinalis) | Boneset (Eupatorium perfoliatum) |
| Common Sneezeweed (Helenium autumnale) | Butterfly Milkweed (Asclepias tuberosa) |
| Golden Alexanders (Zizia aurea) | Culver’s Root (Veronicastrum virginicum) |
| Great Blue Lobelia (Lobelia siphilitica) | Foamflower (Tiarella cordifolia) |
| Marsh Marigold (Caltha palustris) | Foxglove Beardtongue (Penstemon digitalis) |
| Royal Fern (Osmunda regalis) | Green-Headed Coneflower (Rudbeckia laciniata) |
| Sensitive Fern (Onoclea sensibilis) | Indian Grass (Sorghastrum nutans)* |
| Soft Rush (Juncus effuses) | Little Bluestem (Schizachyrium scoparium)* |
| Spotted Joe-Pye Weed (Eutrochium maculatum) | Meadowsweet (Spiraea alba) |
| Swamp Milkweed (Asclepias incarnata) | New England Aster (Symphyotrichum novae-angliae)* |
| Swamp Rose-Mallow (Hibiscus moscheutos) | Pink Tickseed (Coreopsis rosea) |
| Sweet Flag (Acorus americanus) | Red Columbine (Aquilegia canadensis)* |
| Tussock Sedge (Carex stricta) | Seaside Goldenrod (Solidago sempervirens)* |
| White Turtlehead (Chelone glabra) | Switchgrass (Panicum virgatum)* |
Shrubs and Trees
| High-Moisture Areas | Moderate-Moisture or Dry Areas |
|---|---|
| Buttonbush (Cephalanthus occidentalis) | Arrowwood Viburnum (Viburnum dentatum)* |
| Red-Osier, Silky, Gray Dogwoods (Swida spp.) | Black Chokeberry (Aronia melanocarpa)* |
| Smooth Alder (Alnus serrulata) | Cranberry Bush (Viburnum opulus) |
| Spicebush (Lindera benzoin) | Highbush Blueberry (Vaccinium corymbosum)* |
| Swamp Rose (Rosa palustris) | Inkberry (Ilex glabra)* |
| Sweetgale (Myrica gale) | Red Chokeberry (Aronia arbutifolia)* |
| Sweet Pepperbush (Clethra alnifolia)* | Serviceberry (Amelanchier spp.)* |
| Winterberry (Ilex verticillata)* | Yellow Birch (Betula alleghaniensis) |
*These plants are tolerant of coastal conditions, such as salt spray and wind, and may also be appropriate in rain gardens near roadways treated with salt or other deicers during the winter.
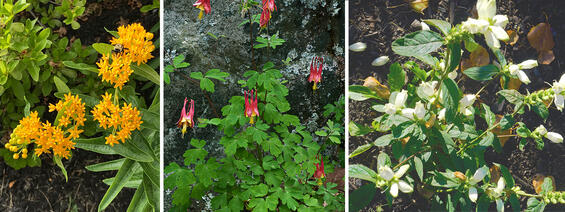
Butterfly milkweed (left), red columbine (middle), and white turtlehead (right) can all be planted in the upper reaches of a rain garden where water tends to drain completely. Their long-blooming flowers are a colorful and attractive addition to a rain garden and an important nectar source for butterflies, bees, and hummingbirds.
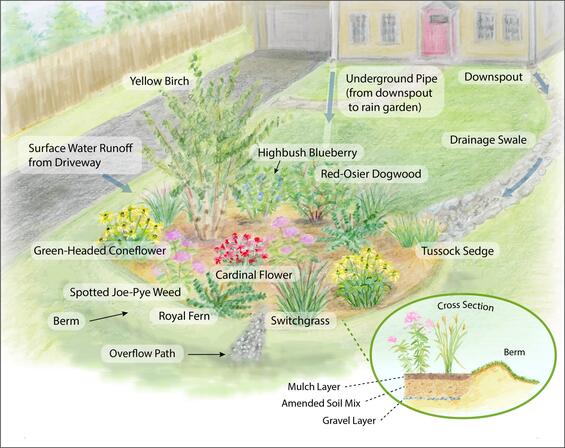
This rain garden with native plants was sited at a low point in the yard to treat runoff from the driveway and rainwater from two roof downspouts (water is directed through a drainage swale from one downspout and an underground pipe for the other). The cross section shows the rain garden base—a layer of gravel, a 6-18” layer of soil mix, and a 2-3” layer of triple shredded mulch. The berm was built with soil removed when digging the rain garden base. An overflow path of crushed stone helps release heavy volumes of water in large rain events.
Management
These management steps can help ensure the long-term success of rain gardens.
- Weed - Weed newly planted rain gardens regularly to help the plants grow successfully and out-compete encroaching lawn grass and other undesirable plants. In particular, check for invasive species and remove them as soon as possible (see the Mass.Gov Invasive Plants website for more on identifying and managing these plants). Once the rain garden becomes established, less weeding will be required.
- Prune, cut, and replace plants - Only minimal pruning and cutting, such as removing dead or diseased limbs, is needed to keep established rain gardens in proportion and healthy. Avoid cutting or deadheading spent perennials in the fall so that they can continue to provide a seed source for birds and habitat for beneficial insects over the winter. Finally, when necessary, replace plants that have died.
- Water - Rain garden plants typically do not require watering once they become established. Newly planted vegetation, however, needs careful watering until the limited root system can effectively find and absorb water from the surrounding soils, particularly when planted in the hot, dry summer months. To ensure plant survival, follow the specific watering instructions on plant labels and seed packets. Adjust water levels if necessary for weather, time of year, and site conditions, such as soil type and sun and wind exposure (i.e., wind-blown areas, sandier soils, and dry, hot weather will warrant extra water). When watering larger perennials, shrubs, and trees, place an open hose (with a slow flow), a soaker hose, or drip tubing at the base of each plant, which will allow water to slowly seep into soils. You can water less each year, with only minimal watering needed in the third year, if at all. During long periods of drought, the rain garden will require watering. Use water that has been collected and stored in rain barrels to maximize your conservation efforts (see Stormwater Solutions for Homeowners Fact Sheet: “Green” Lawn and Garden Practices to find out how).
- Greenscape - Avoid using fertilizers, herbicides, and pesticides, and choose organic methods where possible (see Greenscapes.org for more information). Stormwater Solutions for Homeowners Fact Sheet: “Green” Lawn and Garden Practices has additional information on eco-friendly yard care methods that use less fertilizers and chemicals and promote the use of drought-tolerant native species that benefit the local environment.
- Cover exposed areas with mulch or leaf litter - If the soil dries out quickly, add 2-3 inches of organic bark mulch each spring to prevent moisture loss. (A finer mulch, such as triple shredded, is recommended.) Leaving leaf litter in place is another option to help retain moisture. Leaf litter also naturally fertilizes rain garden plants by releasing nutrients as the organic material decays and provides essential overwintering habitat for beneficial insects. Mulch and leaf litter can also help improve water infiltration and keep weeds down.
- Remove sediment build-up - Inspect rain garden areas every 3-6 months, as well as after large storms, and remove excess sediment (such as silts) that may have accumulated from runoff. (Build-up of sediments decreases infiltration rates and smothers plants.)
- Address any erosion impacts - Inspect the area where water enters and exits the rain garden for signs of erosion, and re-establish the vegetation or add gravel or pea-sized stone if needed to slow stormwater flow and reduce erosion impacts. Where berms show signs of washout or erosion, build them back up and replant with grass or other groundcover to stabilize the soils.
- Minimize standing water - To keep mosquitoes from breeding, check that water does not remain in the rain garden for longer than 24-36 hours. If water does not drain within this timeframe, create a temporary opening in the berm. If the problem persists, you may need to amend the soils to help improve infiltration. (Rain gardens with proper drainage, however, have the added advantage of serving as death traps for mosquito eggs and larvae when they regularly dry out!)
- Expand rain garden size or create an overflow path as necessary - If you find the rain garden is too small to hold and infiltrate the amount of water flowing into it, you can expand the size. Another option is to install a series of interconnected rain gardens or direct overflow to a drainage swale covered with crushed stone or stabilizing vegetation. To create an overflow path, dig a small channel (filled with a layer of gravel or pea-sized stone) from the rain garden to another rain garden or swale (for more on swales, see Stormwater Solutions for Homeowners Fact Sheet: Vegetated Swales). Make sure the runoff is not channeled directly to surface water, wetlands, municipal drainage systems, or your neighbor’s yard.
Additional Information
- For related fact sheets, see the CZM Stormwater Solutions for Homeowners fact sheet website.
- The Massachusetts Executive Office of Energy and Environmental Affairs Raingardens factsheet (PDF, 1.2 KB), produced by GeoSyntec, describes how to design a rain garden and provides rain garden plant lists, sample plans, and photographs.
- MassDEP's Structural BMP Specifications for the Massachusetts Stormwater Handbook (Volume 2, Chapter 2) (PDF, 6.5 MB) has descriptions, design considerations, and pollutant removal efficiency information for various best management practices, including rain gardens.
- MassDEP’s Massachusetts Clean Water Toolkit offers guidance on the prevention and control of nonpoint source pollution and gives links to many fact sheets, including Bioretention Areas (which use soil, plants, and microbes to treat stormwater before it is infiltrated or discharged).
- New Hampshire’s Homeowner’s Guide to Stormwater Management (PDF, 4 MB) provides guidance to help homeowners manage stormwater on their properties and includes detailed information on rain gardens. Their Soak Up the Rain program also has useful tips and information on methods to minimize stormwater runoff.
- New Hampshire’s Native Plants for New England Rain Gardens (PDF, 7 MB) identifies native plants that are adaptable, available, and have been successful for the northern New England region.
- The University of Connecticut’s Nonpoint Education for Municipal Officials (NEMO) Program website provides many useful stormwater resources, including a Rain Gardens website and a link to a mobile device app designed to help homeowners properly install a rain garden on their properties.
- The Ecological Landscape Alliance website, which includes links to their newsletter, conferences, and webinars, offers design ideas and tips from professionals that install rain gardens and other ecological landscapes.
- The Greenscapes web page provides information on “green” lawn and gardening practices and includes a downloadable Greenscapes Guide that details information on how to use attractive, nature-friendly landscaping practices to reduce pollution, conserve water, support wildlife, and protect against climate change.
- Hingham’s Rain Garden Installation video is an on-the-ground tutorial for building a rain garden, with details on how to dig and level the rain garden base, mix soils with compost, and select and install plants. (Please note that compost is no longer recommended as a soil amendment for a rain garden; triple shredded mulch is recommended for its ability to stay in place, help reduce compaction, and lower nitrogen levels.)
- The Association to Preserve Cape Cod’s Rain Garden video showcases a recently installed rain garden as a natural and beautiful way to control and filter storm water runoff.
- The U.S. Environmental Protection Agency (EPA) Soak Up the Rain: Rain Gardens website gives design details for rain gardens, including plant selection, soils, and maintenance requirements specific to Massachusetts.
- EPA’s National Stormwater Calculator is a desktop application that estimates the annual amount of rainwater and frequency of runoff from a specific site. The calculator can also be used to help homeowners determine what mix of rain garden and other stormwater control options can be used to capture this runoff.
- CZM’s Coastal Landscaping website provides information on landscaping coastal areas with salt-tolerant vegetation to reduce storm damage and erosion.
Technical Specifications for Calculating Rain Garden Size
While rain gardens of any size can provide benefits on your property, this section specifies how to more precisely calculate the size (depth and area) needed to fully treat stormwater from a typical storm in Massachusetts. Generally, a rain garden should be at least 1/8 to 1/3 the size of the drainage area to keep its water-level depths between 3-8 inches after a typical 1-inch rainfall. (Deeper water diminishes the ability of rain garden soils and plants to effectively treat and filter stormwater.) To specifically calculate the recommended size, follow these steps:
- Drainage area - First, identify the area that slopes toward the rain garden. Then, calculate the portion of that area with impervious surfaces, which include rooftops, driveways, patios, and other areas that do not readily absorb water (including lawns where soils tend to compact, making it difficult for water to infiltrate). For rooftops, only include the roof area that runs into the particular downspouts that flow to the rain garden. For an example calculation, assume that 400 square feet of driveway, walkway, and lawn are in the drainage area. In addition, a 40-foot by 30-foot roof has half of its area sloping toward and draining to the rain garden (40 feet x 30 feet x 0.5 = 600 square feet). When added to the 400 square feet of other impervious surface, this makes for a total drainage area of 1,000 square feet.
- Volume of runoff - The rain garden should be built to hold runoff for a typical 1-inch rainfall. To calculate this figure in cubic feet, convert 1 inch to feet (1 inch ÷ 12 inches [per foot] = .08 feet). Then, multiply this number by the drainage area calculated in Step 1. In this example, the volume of runoff from the drainage area is 1,000 square feet x .08 feet = 80 cubic feet. (This volume figure will be used in Step 7 to ensure that the size of the rain garden is sufficient.)
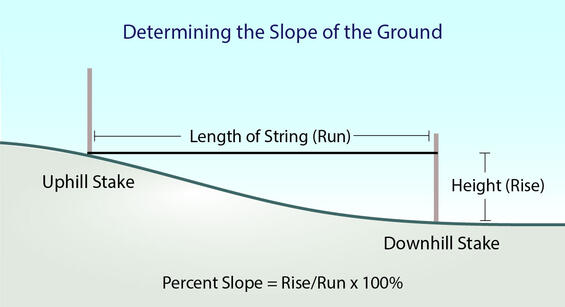
This diagram illustrates the stake and string method for finding the ground slope at the location of the proposed rain garden.
- Slope - The slope of the ground where the rain garden will be located affects how deep the rain garden needs to be. The slope is calculated using this formula: (rise ÷ run) x 100%. (The run is the rain garden length, and the rise is the difference in elevation along that length.) To find these measurements, place one stake on the uphill end of the proposed rain garden and another on the downhill end and tie a string between them. (Run the string from the base of the uphill stake horizontally to the downhill stake; use a line level to ensure the string is horizontal.) The run is the length of the string, and the rise is the height measured from the ground level to the string along the downhill stake. For example, a string 6 inches high at the downhill stake and 120 inches long from stake to stake has a slope of 6 inches ÷ 120 inches x 100% = 5%.
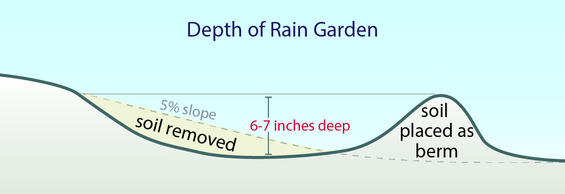
For a ground slope of 5%, a rain garden should be 6-7 inches deep. Soils can be removed from the uphill side of the slope to create the required depth and used to build a berm on the downhill side to contain the rain garden water.
- Depth - Use this slope/depth chart to find the recommended rain garden depth based on the calculated slope. In this example, a 5% slope would require a rain garden depth of 6-7 inches.
| SLOPE | DEPTH |
|---|---|
| < 4% | 3-5 inches |
| 5 - 7% | 6-7 inches |
| 8 - 12% | 8+ inches |
- Size factor - Once you know the appropriate depth, select the size factor for your soil type from this chart. For example, if the soils were found to be silty during the ribbon test, the size factor would be 0.25 for the rain garden depth of 6-7 inches. (This 0.25 represents ¼ of the size of the drainage area and will be used in Step 6.)
| Size Factor | 3-5 inch rain garden depth | 6-7 inch rain garden depth | 8+ inch rain garden depth |
|---|---|---|---|
| Sand Soil Type | 0.19 | 0.15 | 0.08 |
| Silt Soil Type | 0.34 | 0.25 | 0.16 |
| Clay Soil Type | 0.43 | 0.32 | 0.20 |
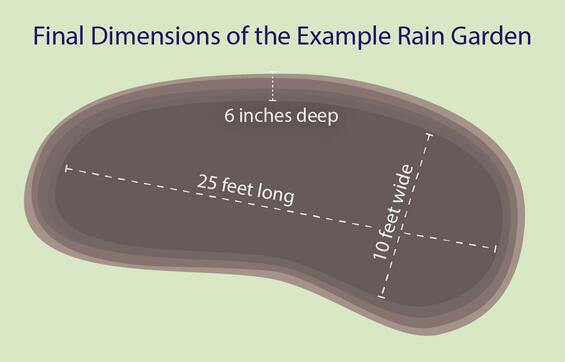
The final dimensions for the example rain garden are 25 feet long, 10 feet wide, and 6 inches deep. This rain garden could hold approximately 125 cubic feet of water.
- Rain garden area - Multiply the size factor by the drainage area calculated in Step 1 to determine the recommended square footage needed for the rain garden. In this example, the drainage area of 1,000 square feet x 0.25 = 250 square feet.
- Final dimensions - Select an appropriate length and width to create a total rain garden area that is equal to or greater than the area calculated in Step 6, and then check that the final dimensions are sufficient. For example, you could choose dimensions of 25 feet long by 10 feet wide to create a 250-square-foot rain garden. The final dimensions of our example rain garden would then be 25 feet long by 10 feet wide by 6 inches (or .5 feet) deep. This rain garden could hold up to 250 square feet x .5 feet = 125 cubic feet of water, which can easily treat the 80 cubic feet of runoff from the drainage area (calculated in Step 2).
Other Available Stormwater Solutions Fact Sheets
Fact sheets are currently available on these techniques:
- Vegetated Buffers - Trees, shrubs, high grasses, perennials, and other vegetation can be strategically planted to help slow, capture, and filter runoff and reduce stormwater impacts.
- “Green” Lawn and Garden Practices - Environmentally friendly yard care methods—such as planting native species, conserving water, and reducing fertilizer and chemical use—help to protect water quality and can save time and money.
- Vegetated Swales - Vegetated swales are channels with moisture-loving plants and amended soils that intercept, treat, and slowly convey stormwater runoff to where it can be effectively infiltrated.
- Reducing Impervious Surfaces - Impervious surfaces (such as asphalt driveways and concrete patios) allow greater volumes of stormwater to flow quickly offsite, carrying contaminants and causing local flooding and erosion. Replacing impervious surfaces with gravel driveways, planted areas, and other options that infiltrate or absorb water can significantly reduce stormwater problems.
- Minimizing Contaminants - Household contaminants—such as oil from automobiles, toxins from pesticides and cleaning products, and bacteria from pet waste and septic systems—can contribute to stormwater pollution. But simple changes at home, from reducing fertilizer use to properly disposing of batteries and other hazardous household products, can help keep inland and coastal waters clean.
- Preventing Erosion - Stormwater can carry sediments that fill storm drains, obstruct channels, smother wetlands, and cause other water quality and habitat impacts. Erosion and sediment controls can help slow and redirect stormwater, reducing erosion and capturing sediments and attached pollutants on site.