Introduction
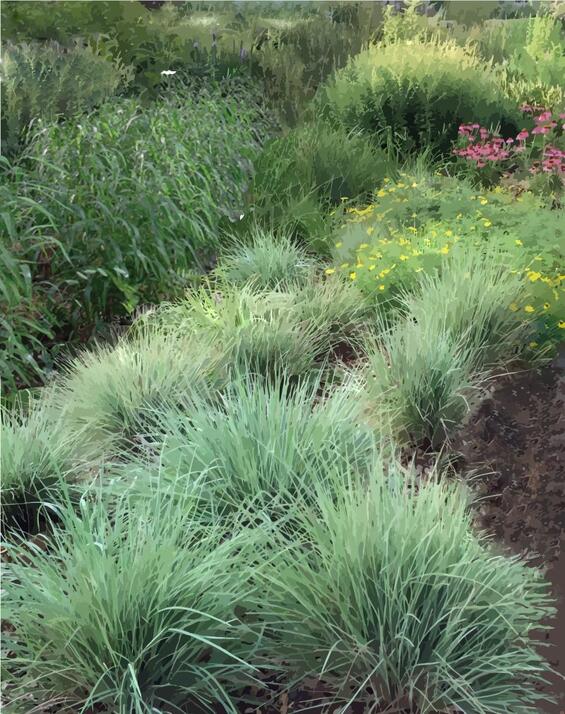
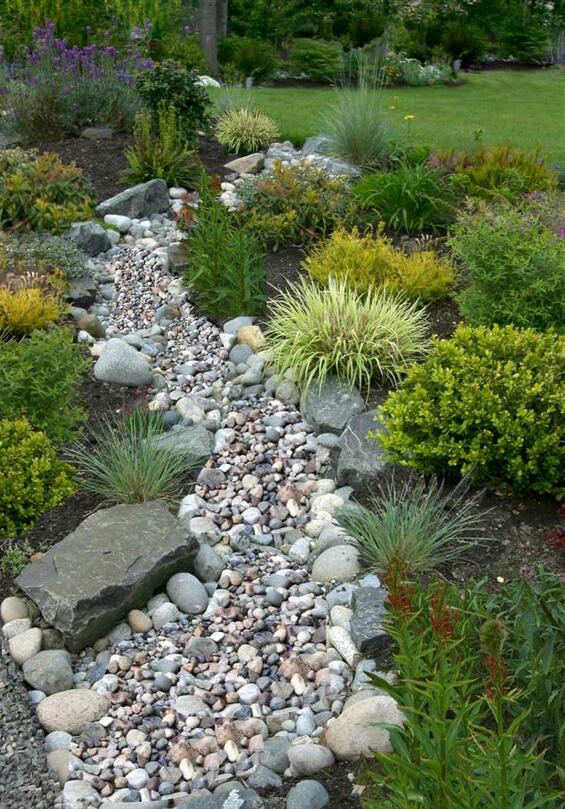
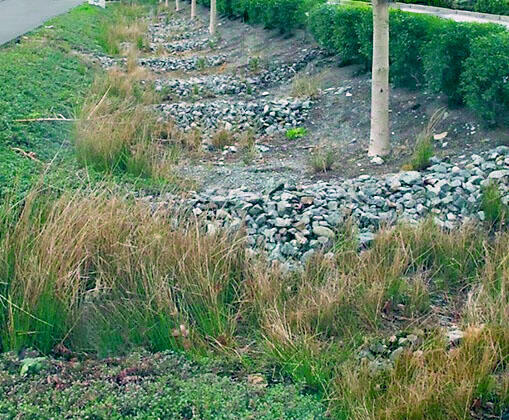
This vegetated swale planted with hardy grasses and perennials collects, slowly conveys, and filters stormwater and reduces runoff.
Vegetated swales are shallow channels designed to intercept, treat, and slowly convey stormwater runoff to an area where it can be effectively infiltrated (i.e., filtered into the ground). The plants and porous soils in the swale slow and absorb the stormwater, allowing the remaining runoff to flow at a more controlled rate. Additionally, pollutants and sediments are captured and removed before infiltrating into the groundwater or running off to waterbodies. Compared to traditional drainage ditches or curbs and gutters that channel runoff into storm drains, vegetated swales can accent the natural landscape, reduce overall stormwater flows, limit flooding, prevent soil erosion and washouts, and improve water quality. Vegetated swales are a relatively low-cost, low-maintenance option and can be combined with rain gardens and vegetated buffers (both are described in separate Stormwater Solutions for Homeowners fact sheets) to further enhance stormwater control. Planting a variety of native grasses, perennials, and shrubs when using these options has the added benefit of providing food and shelter for wildlife and an appealing focal point to your yard.
Unlike rain gardens, which hold and infiltrate water in place, vegetated swales are designed to convey water, making them an attractive alternative to a typical drainage ditch. The long, narrow shape of swales also makes them a good option along driveways, walkways, and roads, as well as a good choice to channel and divert water away from house foundations or other structures.
Impacts to Neighboring Properties - Stormwater management practices must be designed to responsibly collect, convey, and/or infiltrate runoff from your property without transferring stormwater to neighboring properties, roads, and municipal drainage systems. Vegetated swales and other techniques that collect and hold stormwater have the potential to overflow in major storms and could cause “muddy” water to run off your property. When designing these options, be sure that there is enough area on your property to effectively capture and treat any overflow onsite. Management practices that redirect or divert stormwater—such as disconnecting/redirecting downspouts or re-grading the land surface—can similarly cause flooding problems in roadways or neighboring yards, basements, or leach fields (potentially causing a septic system failure). These projects must therefore be designed to ensure that stormwater is not transferred offsite. Carefully following design guidelines in the Stormwater Solutions for Homeowners fact sheets will help you avoid impacts to neighboring properties. If in doubt about offsite impacts, consult a professional, such as a civil engineer or landscape architect.
Photo credit: Mass.gov Image Library; Shutterstock/Gestalt Imagery
For properties near beaches, coastal banks, dunes, floodplains, rivers, salt marshes, wetlands, and other “resource areas” protected under the Massachusetts Wetlands Protection Act,* vegetated swales can be particularly beneficial for helping to reduce stormwater impacts. Projects directly next to or within these resource areas, however, are likely to require a permit through the local Conservation Commission. To maximize the benefits and avoid negative impacts to resources and adjacent properties, permitted projects must be properly designed, installed, and maintained. Vegetated swales (and any stone inlets or outlets) also must not be sited within wet resource areas, such as marshes, swamps, bogs, rivers, streams, ponds, and vegetated wetlands, and a sufficient depth of soil must be maintained between the base of the swale and the water table to allow for proper filtration and treatment. In addition, runoff coming from a swale should not flow directly toward any resource area, since this could cause erosion or water quality problems. During the construction of a vegetated swale, impacts must be minimized by providing erosion and sedimentation controls. The Massachusetts Department of Environmental Protection (MassDEP) Structural BMP Specifications for the Massachusetts Stormwater Handbook (Volume 2, Chapter 2) (PDF, 6.5 MB) provides further descriptions and design requirements for stormwater control projects that are proposed in wetland resource areas and buffer zones. Homeowners are encouraged to contact their local Conservation Commission before undertaking any work to determine whether a resource area exists, what permitting requirements may apply, and how to avoid impacts.
*MGL Chapter 131, Section 40 and corresponding regulations at 310 CMR 10.00.
Should You Hire a Professional? - For projects that must meet the Massachusetts Stormwater Standards (through the permit process), a registered professional engineer is required to prepare and certify engineered plans and calculations. While these requirements do not apply to single-family homes, homeowners may choose to hire a professional—such as a civil engineer, landscape architect, or landscape contractor—to help design and construct vegetated swales, as well as to provide the equipment and means to excavate the ground and bring in materials (such as stones and soil amendments). A professional may also help with plant selection and placement.
Swale Location and Design
Vegetated swales will be most effective when properly sited, sized, and designed with the following steps.
Even small swales like this one with a mix of plants and stones can help capture, treat, and convey runoff.
- Determine swale size, shape, and slope - Vegetated swales of any size can be beneficial on your property since even small swales can capture, treat, and convey stormwater. Technical Specifications for Sizing Vegetated Swales provides advanced, optional steps for calculating a specific swale size to treat the runoff from your drainage area (i.e., the land area that drains runoff to the swale). As a general rule, vegetated swales should be about 18 inches deep to accommodate 12-inch water depths in a typical storm with some room to hold additional water in larger storms. (Deeper water can cause scour of the sides of the swale or drowning of plants and may flow too quickly for adequate water quality treatment.) Vegetated swales should also be 2-10 feet wide at the base to provide a sufficient flat area for water to infiltrate. To reduce the risk of erosion and to help provide additional surface area for water to infiltrate, the side slopes should be relatively gentle at about 25-30%. (A 30% slope is also about the steepest that can be safely mowed.) The slope of the swale along its overall length should be extremely gentle (no steeper than about 1-3 percent) to be most effective at slowly conveying water. If steeper slopes are unavoidable, check dams can provide a mechanism to slow, temporarily pond, and infiltrate stormwater into the soils (see Management for additional details on check dams). Swales can also be constructed with gentle curves and bends to further enhance the slowing of water and the overall appearance and natural look of the swale. For specific instructions on calculating swale length and side slopes, along with diagrams for swale design, see Technical Specifications.
This vegetated swale’s gently sloping surfaces allow water to flow slowly and infiltrate into the soils.
- Protect foundations, septic systems, and drinking water - Vegetated swales should be located at least 10 feet away from home foundations and 50 feet away from septic systems to avoid drainage problems. In addition, avoid placing vegetated swales within 100 feet of drinking water resources, such as private wells, to minimize potential contamination.
- Focus on areas where water is already flowing - Look for areas in your yard that have concentrated stormwater flows, either from roadway and driveway runoff or roof downspouts. If necessary, the ground surface can be slightly regraded to redirect the flow of water toward a vegetated swale. Runoff from the endpoint of the swale can be conveyed to other vegetated areas, such as rain gardens or vegetated buffers, to allow more opportunity for infiltration. Do not direct stormwater from swales toward adjacent properties, which could cause drainage issues for your neighbors or erosion in resource areas. Also, be sure that all components of the project are located on your property (e.g., not the road right of way).

- Check for groundwater - Generally, at least 2 feet of soils are needed between the bottom of the vegetated swale and the water table to effectively filter out pollutants and protect groundwater (as well as provide enough soil depth to sustain plants and their roots). To check if the water table is too high, wait until the groundwater is normally at its highest (in the spring months, typically April through May), but not immediately after a heavy rain. Then, dig a hole 2 feet deeper than the planned base of your vegetated swale. If you see soil mottling (a blotchy pattern of red, orange, or yellow that differs from the rest of the soil, indicating prolonged soil saturation from groundwater), gley (a sticky, waterlogged soil that is a green-blue-gray color), or organic muck, or if water seeps into the hole (wait an hour to check), the location is unsuitable for a vegetated swale. An alternative to digging a hole is to drive rebar or a pipe into the soil and then pull it out and check if it is damp (like using an oil dipstick). If signs of groundwater are found, you will need to try another location.
- Ensure that the water drains properly - The swale should be located and designed so that stormwater is slowly conveyed, adequately infiltrated, and only retained for a day or two (i.e., ponding time should not exceed 48 hours to minimize plant die-off and the potential for mosquito breeding). In addition to checking for groundwater, test the drainage rate for the site by digging a hole at least 1-2 feet deep (again, this is best done in the spring, and you can use the same hole used when checking for groundwater). If water seeps into the hole within an hour, the site does not drain properly. If the hole stays dry, fill it with water. If the water seeps into the ground in less than 24 hours, the location properly drains. If it takes more than 24 hours or does not fully drain, try another location or amend the soil to improve drainage (see Swale Base for information on amending soils).
Swale Base
Use the following techniques when building the base for a vegetated swale.
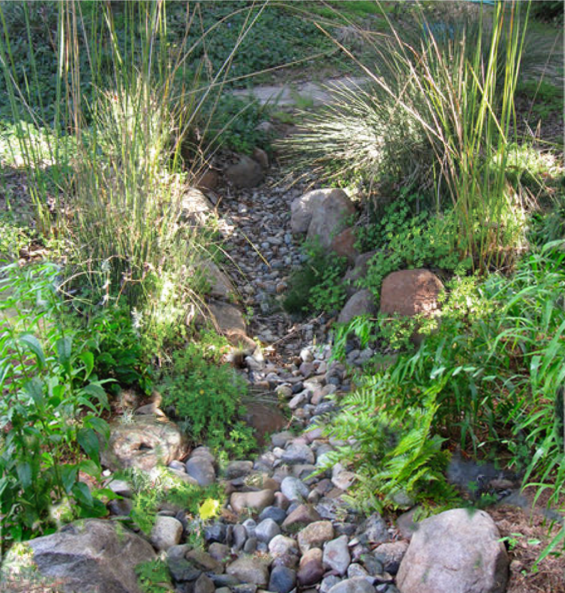
The stone base in this swale works as a walking path in addition to infiltrating and conveying stormwater. The swale’s curves and vegetation also slow water and allow it to be absorbed, infiltrated, and treated. Gravel at the entrance helps slow stormwater flows and reduce erosion impacts.
- Install erosion and sediment controls - Before any digging/excavation work, install compost filter socks, silt fences, or other temporary erosion and sediment controls at the edges of your property or around the project site. See Stormwater Solutions for Homeowners Fact Sheet: Preventing Erosion for details.
- Dig/excavate the base - Mark the edges of the vegetated swale and remove the sod, grass, or other vegetation. Then dig out the full base for the swale and form the side slopes to the outside swale edge. For larger swales, an excavator may be needed to remove soil or regrade the ground surface. When using heavy equipment, be careful not to compact the soil, which reduces infiltration and limits the growth of plants.
- Regrade/configure the swale - Regrading may be needed to provide a gentle slope along the length of the swale (i.e., a slope no steeper than 1-3 percent). Swales can also be constructed with gentle curves and bends to further slow water flow and enhance the overall appearance and natural look of the swale.
- Amend soils for infiltration - Soil amendments may be needed for the swale base to achieve appropriate infiltration rates (ideally, water in the swale should drain within 24 to 48 hours). Soils with low infiltration rates (typically those with a high clay content) will need to be amended or replaced with sand or coarser materials. A layer of crushed stone may be placed under soils to further enhance infiltration. Sites that contain coarse sands and materials that drain water too quickly for effective water quality treatment (or for the growth of plants) will require amendments with a planting soil mix. (See Swale Plantings for information on ensuring topsoil is sufficient for plant growth and stormwater treatment.)
- Add crushed stone - Spread a layer of crushed stone or gravel across the entrance point where the water flows into the swale to slow the speed of stormwater and to prevent erosion. A layer of crushed stone or gravel can also be used to create a walking path through the swale, providing access and making it easier to maintain plants. As water flows through the crushed stone, sediments also settle out, enhancing the treatment process. The stone will eventually accumulate sediment and require maintenance to prevent clogging (see Management for more).
Swale Plantings
Follow these guidelines for selecting, locating, and planting the appropriate species for a vegetated swale and for promoting successful plant growth.
- Plant selection and placement - To improve stormwater absorption and treatment and promote plant survival and diversity, choose a variety of native shrubs, grasses, perennials, and groundcovers and plant them in high densities. While small trees can be used, large trees should be avoided because they shade out understory plants. Only vigorously growing plant species with deep root systems that can tolerate flowing water and inundation, resist scouring, and help prevent erosion should be used in swales. Native species are the best options because they are well adapted to the local climate and environment, typically do not require chemical fertilizers and pesticides, and provide food and habitat for wildlife. Plants selected for the bottom of the swale should be particularly tolerant of water flow and temporary inundation. Certain perennials, long grasses, and sedges can survive in these conditions, as well as water-tolerant woody shrubs. Along the sides and upper edges of swales, a variety of perennials, groundcovers, shrubs, and small trees can be used to provide additional opportunities for infiltration and pollutant removal, especially from late fall through early spring when grasses or perennials are dormant. These plants should be tolerant of both wet and dry conditions (including drought conditions when soils drain completely for extended durations). For swales located along roadways or on the coast, salt-tolerant species are needed (see CZM’s Coastal Landscaping website for a selection of plants specific to these conditions). Native Plants for Vegetated Swales in Massachusetts provides a list of recommended species.
- Soils - In areas of the swale to be planted, ensure that the topsoil effectively promotes plant growth. Though soils must be course enough for proper swale drainage (as described in “Amend soils for infiltration” in the Swale Base section), the topsoil should be rich in organic matter to hold moisture and support plant life. A planting soil mix or amendments to boost existing soil structure and nutrient levels may be needed for poor soils (but avoid the use of compost due to the high phosphorus content).
- Mulch - Ultimately, swale plants should create a dense cover that does not require mulch. Until then, you can use a triple shredded mulch (which tends to stay in place better than other mulch options) to help prevent weed growth, retain moisture, and prevent erosion and compaction. Do not use light-weight wood chips or straw because they are easily washed away.

This illustration shows a vegetated swale planted with a mix of perennials, grasses, shrubs, and a small tree. A stone check dam constructed perpendicular to the stormwater flow helps to slow and store the water, which is infiltrated into the soils and absorbed by plants.
- Aesthetics - Use a mix of species with different heights, forms, and flowering color and times to enhance the appearance of the vegetated swale.
- Planting instructions - Plant each species at the appropriate time of year (generally spring or fall when more moisture is available) and follow the specific planting and care instructions provided on the plant labels. Clump-forming grasses, perennials, shrubs, and small trees are typically planted from containers. If seeding the swale, you may need to lightly mix the seed into the topsoil to help the plants sprout effectively (you may also use more seed than recommended on the packet to help ensure that the seedlings will outcompete weeds and invasive species). Watering should be done carefully to prevent seeds from being washed out. To help prevent heavy rains from washing out soil, seeds, and new plants, install an erosion-control blanket made of natural fibers over the ground surface of the swale to stabilize the soil until the plants become established. Natural fiber blankets are most effective when they are staked into the ground and placed in close contact with the soil or sediments, allowing the shoots to grow up through them (for details, see CZM’s StormSmart Properties Fact Sheet 5: Bioengineering - Natural Fiber Blankets on Coastal Banks).
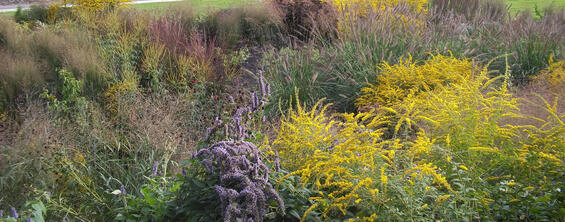
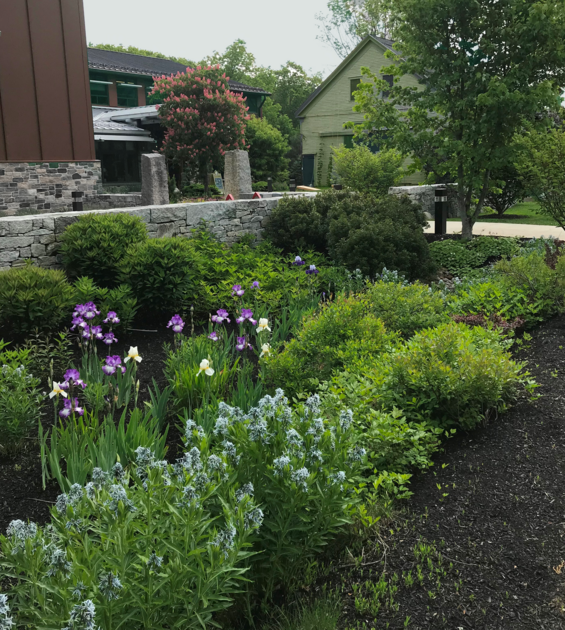
Planting a mix of hardy perennial wildflower and grass species can work to slow and absorb water, while also offering a variety of colors, textures, and forms in the landscape, as well food and shelter for birds and pollinators. Many of these plants can also reseed themselves providing more robust cover with each year.
Native Plants for Vegetated Swales in Massachusetts
The native plants listed in the following tables are good choices for vegetated swales. The plants are categorized by their suitability for the lower swale base (high water flow and wet conditions) or the side slopes, banks, and upper areas of swale base (wet and dry conditions).
Perennials and Grasses
| Lower Swale Base (High Water Flow and Wet Conditions) | Side Slopes, Banks, and Upper Areas of Swale Base (Wet and Dry Conditions) |
|---|---|
| Blue Flag Iris (Iris versicolor) | Big Bluestem (Andropogon gerardii) |
| Canada Bluejoint (Calamagrostis canadensis) | Butterfly Milkweed (Asclepias tuberosa) |
| Cardinal Flower (Lobelia cardinalis) | Foamflower (Tiarella cordifolia) |
| Common Spikesedge (Eleocharis palustris) | Golden Alexanders (Zizia aurea) |
| Jointed Rush (Juncus articulatus) | Little Bluestem (Schizachyrium scoparium) |
| Hop Sedge (Carex lupulina) | New England Aster (Aster novae-angliae) |
| Marsh Marigold (Caltha palustris) | New York Ironweed (Vernonia noveboracensis) |
| Soft-Stem Bulrush (Schoenoplectus tabernaemontani) | Pennsylvania Sedge (Carex pensylvanica) |
| Spotted Joe-Pye Weed (Eutrochium maculatum) | Red Columbine (Aquilegia canadensis) |
| Swamp Milkweed (Asclepias incarnata) | Swamp Verbena (Verbena hastata) |
| Sweet Flag (Acorus americanus) | Switchgrass (Panicum virgatum) |
| Sweet Joe-Pye Weed (Eutrochium purpureum) | Tufted Lovegrass (Eragrostis pectinacea) |
| Tussock Sedge (Carex stricta) | Virginia Strawberry (Fragaria virginiana) |
| Virginia Wild Rye (Elymus virginicus) | |
| White Turtlehead (Chelone glabra) | |
| Yellow Plume Grass (Sorghastrum nutans) |
Shrubs and Trees
| Lower Swale Base (High Water Flow and Wet Conditions) | Side Slopes, Banks, and Upper Areas of Swale Base (Wet and Dry Conditions) |
|---|---|
| Common Buttonbush (Cephalanthus occidentalis) | American Witch Hazel (Hamamelis virginiana) |
| Cranberry (Vaccinium macrocarpon) | Arrowwood Viburnum (Viburnum dentatum) |
| Leatherleaf (Chamaedaphne calyculata) | Black Elderberry (Sambucus nigra) |
| Swamp Rose (Rosa palustris) | Gray Dogwood (Swida racemosa) |
| Swamp White Azalea (Rhododendron viscosum) | Highbush Blueberry (Vaccinium corymbosum) |
| Sweet Gale (Myrica gale) | Inkberry (Ilex glabra) |
| Lowbush Blueberry (Vaccinium angustifolium) | |
| Nannyberry (Viburnum lentago) | |
| Ninebark (Physocarpus opulifolius) | |
| Red Chokeberry (Aronia arbutifolia) | |
| Serviceberry (Amelanchier spp.) | |
| Speckled Alder (Alnus incana) | |
| Spicebush (Lindera benzoin) | |
| Sweet Pepperbush (Clethra alnifolia) | |
| Winterberry (Ilex verticillata) | |
| Yellow/Swamp Birch (Betula alleghaniensis) |
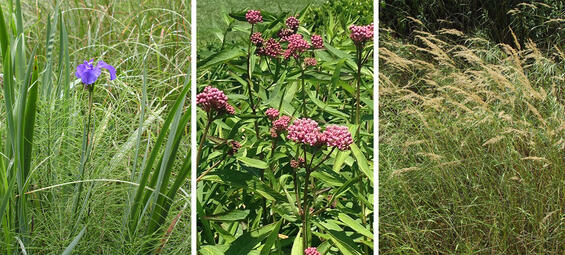
Blue flag iris (left), swamp milkweed (middle), and Canada bluejoint (right) are all hardy enough to withstand the wet conditions and water flow of the swale base. (Photo credits: blue flag iris, NOAA Photo Library; Canada bluejoint, Salicicola)
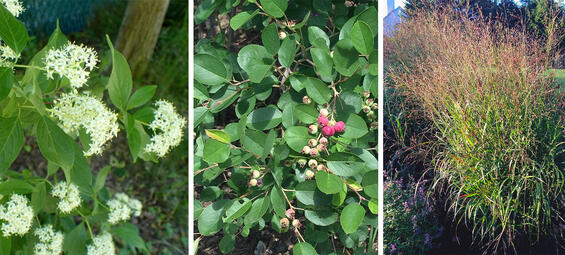
Gray dogwood (left), highbush blueberry (middle), and switchgrass (right) are good choices for the upper areas or side slopes of a vegetated swale and offer interest throughout the summer and into fall. (Photo credits: gray dogwood, Salicicola)
Management
These management practices can help ensure the success of vegetated swales.
- Water - Vegetated swale plants typically do not require watering once they become established. Newly planted vegetation, however, needs careful watering until the limited root system can effectively find and absorb water from the surrounding soils, particularly when planted in the hot, dry summer months. To ensure plant survival, follow the specific watering instructions given on plant labels and seed packets and adjust amounts if necessary for weather, time of year, and site conditions like soil type and sun and wind exposure (i.e., sandier soils, windblown areas, and dry, hot weather will warrant extra water). When watering larger perennials, shrubs, and trees, place an open hose (with a slow flow), a soaker hose, or drip tubing at the base of each plant, which will allow water to slowly seep into soils. You can water less each year, with only minimal water needed in the third year, if at all. During long periods of drought, the swale will require watering. Use water that has been collected and stored in rain barrels to maximize your conservation efforts (see Stormwater Solutions for Homeowners Fact Sheet: “Green” Lawn and Garden Practices for details).
- Amend soils as necessary - Since the success of plants and the infiltration capacity of the swale will be largely dependent on the soils, amendments may be needed over time to maintain swale function. For swales that receive runoff from a roadway or parking lot—which contains road salts and sands that damage soil structure—a planting soil mix should be added to increase the nutrient content of the soils to help plants grow (maximize your success by planting salt-tolerant plants in these areas). For swales that show signs of decreased infiltration (i.e., holding water for more than 24-48 hours), sand or other coarse materials should be added to assist with drainage. Till the soil at the bottom of the swale before adding amendments.
- Weed - Weed newly planted vegetated swales regularly to help prevent invasive plants and encroaching lawn grass from taking over. Once plants become established, less weeding will be required—but be sure to continue inspecting for invasive species and remove them if they are present.
- Prune and cut - Only minimal pruning and cutting, such as removing dead or diseased limbs, is needed to keep established vegetated swales in proportion and healthy. Avoid cutting or deadheading spent perennials in the fall so that they can continue to provide a seed source for birds and habitat for beneficial insects over the winter. To maintain grassed vegetated swales, mow the area once every 1-2 years to prevent the growth of woody plants. Avoid cutting the grass shorter than the predicted water flow depth, which could jeopardize the capacity of the swale to treat stormwater. Mow in late winter/very early spring to minimize impacts to wildlife and the growing plants.
- Remove sediment and debris - A build-up of sediments can decrease infiltration rates, smother plants, and create a damming effect that slows water flow. Inspect vegetated swales once every 3-6 months, as well as after large storms, and remove excess sediments (such as silt) that have accumulated at the swale entrance or any outlets or overflow drains. Sediment build-up should also be removed from within the swale, provided plants are not pulled up or damaged in the process. To avoid damaging plants, gently scrape up sand and sediments with a shovel, optimally in the early spring before plants have started their seasonal growth. Also be sure to remove any leaves or other debris that may clog swales and prevent stormwater from soaking into the ground.
- Prevent erosion - Keeping the vegetated swale well vegetated will eliminate most erosion problems. Inspect the area where water enters and exits the vegetated swale for signs of erosion, and add extra crushed stone/gravel if needed to slow stormwater flows and reduce erosion impacts.
In this swale, the check dams consisting of large stones help control the flow rate of stormwater, allowing for pooling, infiltration, and treatment of stormwater.
- Add check dams as needed - If water flows too quickly in your swale—causing erosion, scour, or excess runoff—consider adding check dams (or berms). These low barriers temporarily hold water upstream to promote ponding, infiltration, sediment removal, and reduction of stormwater flows. Check dams are particularly useful in areas with steeper slopes or within long swales and can be constructed of wood, logs, fiber logs, stone, or a combination of materials (soil check dams are not recommended due to potential erosion). Check dams should typically be no higher than half the height of the swale banks. To help prevent water from scouring out the sides or undercutting the bottom of the check dam, extend the ends of the check dam up the bank slope and embed the bottom of the entire check dam into the soils. When selecting a stone size for stone check dams, consider the slope and volume of water (i.e., larger stones are needed for higher water volumes and steeper slopes). For best results, use a mix of stone sizes. The spacing of check dams will depend on both the slope and height of the swale, but typically only one or two dams are needed for swales less than 100 feet in length. Ensure that the soils are particularly permeable in the area where ponding occurs upstream of the check dams. If not properly maintained, check dams can collect leaves, sediments, and other debris that can raise water levels that may overtop the ends of the check dam or even the swale’s banks. To avoid these problems, monitor check dams on a routine basis, remove debris and sediment build up, and make necessary repairs for washouts and damage.
- Add overflow paths and underdrains as needed - Help control flooding issues in the vegetated swale by creating an overflow path or an underdrain to deal with heavy volumes of water in large rain events and when frozen ground may prevent water infiltration. An overflow path can be dug out at the end of the swale to allow excess water to flow above ground to another stormwater control technique, such as a rain garden, vegetated buffer, or even another swale (crushed stones within the overflow path can help diffuse water for a more controlled flow). Alternatively, an underdrain consisting of a perforated pipe surrounded by crushed stones can be positioned at the end of the swale to convey the overflow underground to a rain garden or other stormwater control option. For more information about rain gardens, vegetated buffers, and other stormwater control techniques, see the Stormwater Solutions for Homeowners website. Whichever option you choose, make sure the runoff is not channeled directly to surface water, wetlands, municipal drainage systems, or your neighbor’s yard.
- Use “green” management practices - Avoid using fertilizers, herbicides, and pesticides and choose organic methods where possible (see GreenScapes.org for more information). Stormwater Solutions for Homeowners Fact Sheet: “Green” Lawn and Garden Practices has additional information on eco-friendly yard care methods that use less fertilizers and chemicals and promote the use of drought-tolerant native species that benefit the local environment.
Additional Information
- For related fact sheets, see the CZM Stormwater Solutions for Homeowners fact sheet website.
- The U.S. Environmental Protection Agency’s (EPA) Storm Water Technology Fact Sheet: Vegetated Swales includes detailed information on swale design criteria, advantages and disadvantages, configuration and sizing procedures, performance measures, and maintenance and cost requirements.
- CZM’s Coastal Landscaping website has details on landscaping coastal areas with salt-tolerant vegetation to reduce storm damage and erosion.
- MassDEP’s Structural BMP Specifications for the Massachusetts Stormwater Handbook (Volume 2, Chapter 2) (PDF, 6.5 MB) provides descriptions, design considerations, and pollutant removal efficiency information for various best management practices, including vegetated swales.
- MassDEP’s Massachusetts Clean Water Toolkit offers guidance about the prevention and control of nonpoint source pollution and provides links to many fact sheets, including Vegetated Filter Strips and Water Quality Swales.
- The Massachusetts Low Impact Development Toolkit, developed by the Metropolitan Area Planning Council, provides fact sheets and details on low impact development methods, including Vegetated Swales.
- The Ecological Landscape Alliance website, which includes links to their newsletter, conferences, and webinars, offers design ideas and tips from professionals that install vegetated swales and other ecological landscapes.
- The New Hampshire Department of Environmental Services Stormwater website provides resources to help protect water quality and the environment, and includes a do-it-yourself Homeowner’s Guide to Stormwater Management (PDF, 4 MB) with a section on vegetated swales.
- EPA’s National Stormwater Calculator is a desktop application that estimates the annual amount of rainwater and frequency of runoff from a specific site and can be used to help homeowners determine runoff rates based on their use of various stormwater control options, including vegetated swales.
Technical Specifications for Sizing Vegetated Swales
While vegetated swales of any size can be beneficial, this section provides some advanced, optional steps for calculating specific swale dimensions according to technical specifications recommended for Massachusetts, which call for a swale to be designed to hold the first inch of stormwater runoff from the contributing drainage area. In the following instructions, numbers highlighted in bold and italics will be used in example calculations in the text and within the figures.
- Swale shape - Generally, swales are most effective when designed as a trapezoidal channel (see Figure 1), which provides area along the swale base, side slopes, and length for water to infiltrate.
- Base width and side slopes - As discussed in Swale Location and Design, the swale base should be 2-10 feet wide and the side slopes should be no greater than 25-33% (see Figure 1). For this example, a 3-foot base width and a 25% side slope were selected.
- Designed water depth - The swale should be designed to hold the first 1 inch of runoff from the contributing drainage area and be a minimum depth of 12 inches (see Figure 1). These design specifications help avoid potential scour of swale surfaces, prevent drowning of plants, and ensure adequate water quality treatment for this “first flush” of stormwater, which typically contains the highest pollutant concentrations. For this example, a designed water depth of 1 foot (12 inches) was selected.
- Freeboard and total swale depth - While rainfall events of more than 1 inch are relatively rare in Massachusetts (less than 10% of storms), the swale should be built with added depth (known as freeboard) to prevent potential spillover or overtopping during these larger storms. Approximately 4-6 inches of freeboard should be added to the designed water depth to get total swale depth—measured from the bottom of the swale (lowest point of excavation) to the top of the swale (ground elevation of the surrounding land) (see Figure 1). For this example, 0.5 foot (6 inches) of freeboard was selected for a total swale depth of 1.5 feet (18 inches).
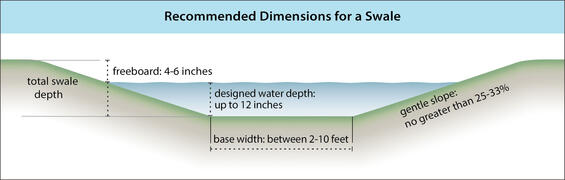
Figure 1. The recommended shape, width, side slope, and depth for a vegetated swale.
- Overall slope of the ground surface along the length of the swale - As discussed in Swale Location and Design, the slope along the overall length of the swale should be between 1 and 3 percent (slope = [rise ÷ run] x 100%). For this example, assume that the grade of the land where the swale will be installed has a 2.5% slope (see calculations in Figure 2).
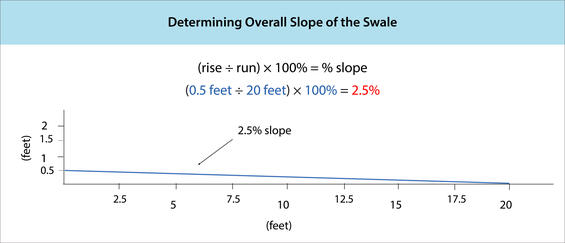
Figure 2. An example calculation for the overall swale slope. The blue line (which represents the grade of the land) has a 2.5% slope, calculated by dividing the 0.5-foot height (rise) by the 20-foot length (run) and multiplying by 100%.
- Top width of the swale - The top of the swale must be wide enough to allow for the designed side slopes and base width. (When digging out the swale, this top width dimension will be used to mark the outside borders of the swale at ground level.) Figure 3 shows a cross-section of a trapezoidal swale and the calculations for determining the top width, which equals the base width plus the two side slope widths. Each side slope width can be calculated using the slope formula ([rise ÷ run] x 100% = % slope) and solving for “run.” In this example, the % slope (i.e., the side slope of the swale) is 25 and the rise (i.e., the total swale depth with freeboard) is 1.5 foot. Solving for “run” (i.e., [1.5 ÷ X] x 100 = 25) results in a 6-foot width for each side slope. Adding the three widths together results in a 15-foot top width (i.e., 3 feet + 6 feet + 6 feet = 15 feet).
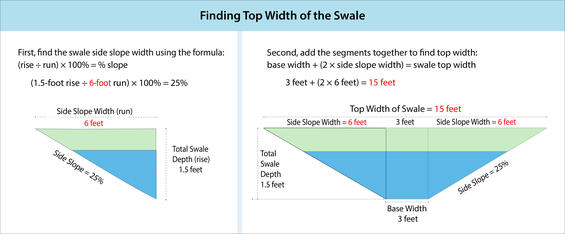
Figure 3. The recommended approach for calculating the top width of the swale. Note that the example values selected for base width, side slope, and depth are used to calculate the side slope widths and top width, which are given in red.
- Swale length - To calculate overall swale length, the following values are needed: 1) the volume of water flowing to the swale from the first 1 inch of runoff from the contributing drainage area, 2) the width of the water surface in the swale at the designed water depth, and 3) the cross-sectional area of the water column in the swale at the designed water depth. See Figure 4 for an illustration of these calculations.
- To determine the volume of water from the first 1 inch of runoff, multiply the area of the impervious surface that drains to the swale (in feet squared) by 0.08 feet (which is 1 inch converted to feet). In this example, assume the impervious drainage area is 2,500 square feet (representing a 1,000 square-foot driveway, 500 square-foot patio with walkways, and 1,000 square-foot portion of roof that drains to the swale). The water from the contributing drainage area therefore has a volume of 200 cubic feet (i.e., 2,500 square feet x 0.08 feet = 200 cubic feet).
- To calculate the width of the water surface, use the same approach for finding the overall top width of the swale—but instead of the total swale depth for the rise, use the designed water depth (i.e., the depth without freeboard). In this example, the designed water depth is 1 foot (12 inches) and the side slope is 25%, so solving for run (i.e., [1 ÷ X] x 100 = 25) would result in a 4-foot width for each side slope and an 11-foot width of water surface (i.e., 3 feet + 4 feet + 4 feet = 11 feet).
- To calculate the cross-sectional area of the water column, use the formula for the area of a trapezoid: trapezoid area = (surface water width + base width)/2 x water depth. In this example, the surface water width is 11 feet, the base width is 3 feet, and the water depth is 1 foot, resulting in a trapezoid area equal to 7 square feet (i.e., [11 feet + 3 feet]/2 x 1 foot = 7 square feet).
- The overall length is then calculated by using the formula: volume of trapezoidal channel = trapezoid area x length, where the volume of the channel (i.e., the volume of water) and trapezoid area (i.e., the cross-sectional area of the water column) are known variables and length is the unknown. In this example, water volume (200 cubic feet) = area of trapezoid (7 square feet) x length of swale (28.6 feet) (i.e., 200 cubic feet/7 feet = 28.6 feet). The overall length of the swale should therefore be at least 28.6 feet to hold 200 cubic feet of water at a depth of 1 foot (while the 6 inches of freeboard can help address greater water volumes in larger storms).
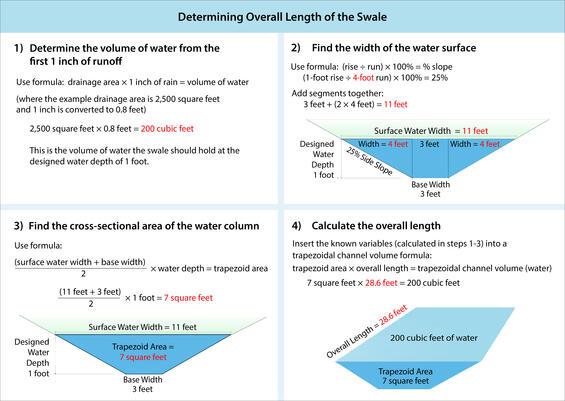
Figure 4. The final length of the swale based on the calculated dimensions for swale water volume, width, and trapezoidal area.
- Final Dimensions - Once the swale dimensions are calculated and confirmed, sketch out the final swale design (see Figure 5 for an example). These specifications will be used to mark out the proposed location and extent of the swale for digging/excavation. This final design can be adjusted to find a configuration that works best on your property by altering the base width, side slope, and/or length measurements—while ensuring that the same volume of water can be accommodated and that all dimensions remain within recommended ranges. Remember to follow the guidelines for locating and designing, building, planting, and managing your vegetated swale to maximize success.
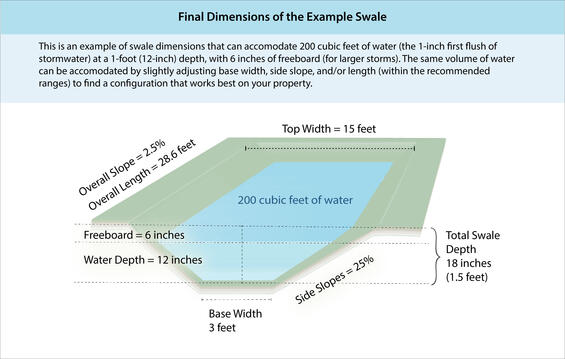
Figure 5. The final swale dimensions based on the example calculations in this section (not drawn to scale).
Other Available Stormwater Solutions Fact Sheets
Fact sheets are currently available on these techniques:
- Vegetated Buffers - Trees, shrubs, high grasses, perennials, and other vegetation can be strategically planted to help slow, capture, and filter runoff and reduce stormwater impacts.
- “Green” Lawn and Garden Practices - Environmentally friendly yard care methods—such as planting native species, conserving water, and reducing fertilizer and chemical use—help to protect water quality and can save time and money.
- Rain Gardens - Rain gardens are specially designed and planted depressions in the ground that collect, filter, and treat stormwater.
- Reducing Impervious Surfaces - Impervious surfaces (such as asphalt driveways and concrete patios) allow greater volumes of stormwater to flow quickly offsite, carrying contaminants and causing local flooding and erosion. Replacing impervious surfaces with gravel driveways, planted areas, and other options that infiltrate or absorb water can significantly reduce stormwater problems.
- Minimizing Contaminants - Household contaminants—such as oil from automobiles, toxins from pesticides and cleaning products, and bacteria from pet waste and septic systems—can contribute to stormwater pollution. But simple changes at home, from reducing fertilizer use to properly disposing of batteries and other hazardous household products, can help keep inland and coastal waters clean.
- Preventing Erosion - Stormwater can carry sediments that fill storm drains, obstruct channels, smother wetlands, and cause other water quality and habitat impacts. Erosion and sediment controls can help slow and redirect stormwater, reducing erosion and capturing sediments and attached pollutants on site.